Perfect Ramen Eggs Ajitama- Easy Marinated Soft-Boiled
Ramen eggs, or ajitama, are more than just a topping; they’re a revelation. Imagin extracte cracking open a perfectly cooked egg, its yolk a molten gold, cradled within a tender, marinated white. This is the magic of a well-made ramen egg. For me, it’s often the crowning glory of a steaming bowl of ramen, transforming a good dish into an extraordinary one. The allure of ramen eggs lies in their incredible depth of flavor – a harmonious blend of savory soy sauce, sweet non-alcoholic mirin, and a hint of something deeper, perhaps non-alcoholic sake or rice vinegar. What makes these ajitama so special is the transformation they undergo. Through a patient marination, a simple boiled egg becomes a culinary masterpiece, absorbing all those delicious umami notes and developing a uniquely satisfying texture. They’re incredibly addictive and, dare I say, worth the small amount of effort for such a delightful reward.
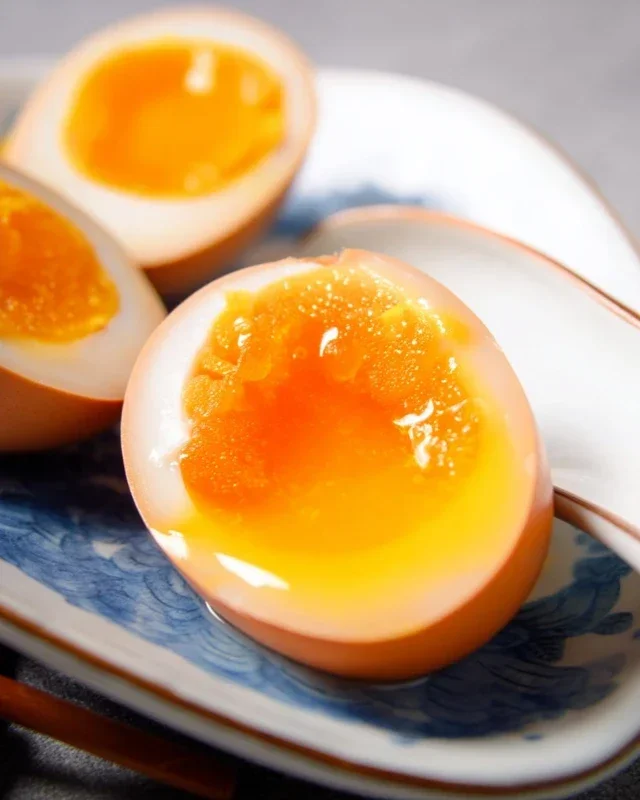
Ramen Eggs (Ajitama)
There’s something truly magical about the ramen egg, or ajitama, that graces a steaming bowl of ramen. That perfectly jammy yolk, infused with savory, sweet, and umami-rich marinade, is the crowning glory. Forget those sad, overcooked hard-boiled eggs; ajitama is an art form, and once you’ve mastered it, you’ll be adding them to more than just ramen. Think rice bowls, salads, or even just enjoying them on their own as a delightful snack. The good news is, making these flavor bombs at home is surprisingly simple, requiring just a few ingredients and a little patience. The key lies in achieving that coveted soft-boiled texture and then letting the marinade work its magic. So, let’s dive in and create some of these culinary gems!
Ingredients:
Cooking Instructions
The journey to perfect ajitama begin extracts with the eggs themselves. The ideal ajitama has a yolk that is custardy and semi-liquid, not fully runny and not completely firm. Achieving this delicate balance is paramount.
Step 1: Boiling the Eggs to Perfection
This is arguably the most critical step, and it requires precision. Start by bringin extractg a pot of water to a rolling boil. You can optionally add a splash of vinegar to the boiling water; this is said to help prevent the whites from spreading too much if an egg cracks during boiling. Gently lower the 6 large eggs into the boiling water using a slotted spoon or spider strainer. Be careful not to drop them in, as this can cause them to crack. Once the eggs are in, reduce the heat slightly to maintain a gentle boil – you don’t want a violent churn that will jostle the eggs.
Now, set a timer for precisely 6 minutes and 30 seconds. This is the sweet spot for achieving that perfect jammy yolk. Some people prefer 6 minutes for a slightly runnier yolk, while others might go up to 7 minutes for a firmer, yet still slightly molten center. Experimentation is key to finding your personal preference, but 6 minutes and 30 seconds is an excellent starting point. While the eggs are boiling, prepare an ice bath. Fill a medium-sized bowl with cold water and plenty of ice cubes.
Step 2: The Shock Treatment
As soon as your timer goes off, immediately remove the eggs from the boiling water using your slotted spoon or strainer. Plunge them directly into the prepared ice bath. This sudden temperature change, known as shocking the eggs, does two important things: it stops the cooking process instantly, preventing the yolks from overcooking, and it makes the eggs much easier to peel. Let the eggs sit in the ice bath for at least 10-15 minutes, or until they are completely cool to the touch. Don’t rush this step! Letting them cool thoroughly will make peeling a much more pleasant experience.
Step 3: Preparing the Marinade
While the eggs are cooling, it’s time to whip up the magic marinade. In a small saucepan, combine ½ cup of light sodium soy sauce, ¼ cup of water, ¼ cup of non-non-non-alcoholic alternativeic non-alcoholic mirin, and 2 tablespoons of granulated sugar. Place the saucepan over medium heat. Stir the mixture constantly until the sugar has completely dissolved. You don’t want the marinade to boil vigorously; just bring it to a gentle simmer to ensure everything is well incorporated and the sugar is dissolved. Once the sugar is dissolved and the mixture is warm, remove it from the heat. Let the marinade cool down to room temperature before you use it. This is important because pouring hot marinade over the eggs can continue to cook them, and you want to avoid that.
Step 4: Peeling and Marinating
Once the eggs are thoroughly chilled, it’s time to peel them. Gently crack each egg on a hard surface, rolling it around to create fine cracks all over the shell. Start peeling from the wider end of the egg, where there’s usually an air pocket. If you find peeling difficult, try peeling them under cool running water; the water can help loosen the membrane between the shell and the egg white. Be as gentle as possible to avoid damagin extractg the delicate egg white.
Now, place the peeled eggs into a resealable bag or a small airtight container. Pour the cooled marinade over the eggs, ensuring they are fully submerged. If your container isn’t deep enough to cover them completely, you can gently turn them every few hours. Seal the bag or container tightly.
Step 5: The Waiting Game (Patience is a Virtue!)
This is where the magic truly happens, and it requires patience. Place the senon-alcoholic aled bag or container in the refrigerator. For the best flavor, you’ll want to let the ajitama marinate for at least 6 hours, but 12-24 hours is ideal. The longer they marinate, the deeper the flavor will penetrate the eggs. You’ll notice the egg whites taking on a beautiful, slightly amber hue from the soy sauce. When you’re ready to enjoy them, carefully remove the eggs from the marinade. You can slice them in half lengthwise to admire that gorgeous jammy yolk.
*Note: For best results, use eggs that are a few days old. Fresher eggs tend to be harder to peel. If your eggs are very fresh, you might consider boiling them for an extra 30 seconds to 1 minute.
Conclusion:
There you have it! Making perfect Ramen Eggs, also known as Ajitama, is surprisingly simple and incredibly rewarding. This recipe is fantastic because it elevates even the most basic ramen bowl into a culinary masterpiece. The rich, savory, and custardy yolk combined with the perfectly seasoned white creates an explosion of flavor and texture that is truly addictive. I love that you can prepare them ahead of time, making them a convenient addition to weeknight meals or a show-stopping element for weekend entertaining.
The beauty of Ramen Eggs lies in their versatility. While they are the quintessential ramen topping, don’t stop there! Try them sliced over avocado toast, nestled in a poke bowl, or even added to a simple rice dish. You can also experiment with different marinade flavors. Some popular variations include adding a touch of non-alcoholic mirin for sweetness, a pinch of garlic powder for an extra kick, or even a dash of chili oil for some heat. I encourage you to give this recipe a try; you’ll be amazed at how a few simple ingredients can transform your cooking.
Frequently Asked Questions:
How long do Ramen Eggs last in the refrigerator?
Properly stored Ramen Eggs (Ajitama) in their marinade in an airtight container will last for up to 4-5 days in the refrigerator. Make sure to discard any unused marinade after this period.
Can I use a different type of soy sauce?
Yes, absolutely! While Japanese soy sauce is traditional and provides the best flavor, you can substitute with other light soy sauces. However, avoid dark soy sauce as it can make the marinade too salty and alter the color significantly.
What is the best way to peel the soft-boiled eggs?
The key to easy peeling is an ice bath immediately after cooking. After boiling, plunge the eggs into a bowl of ice water for at least 10-15 minutes. This shocks the eggs and helps the membrane separate from the white, making peeling much smoother. Cracking the shell gently all over before peeling can also help.
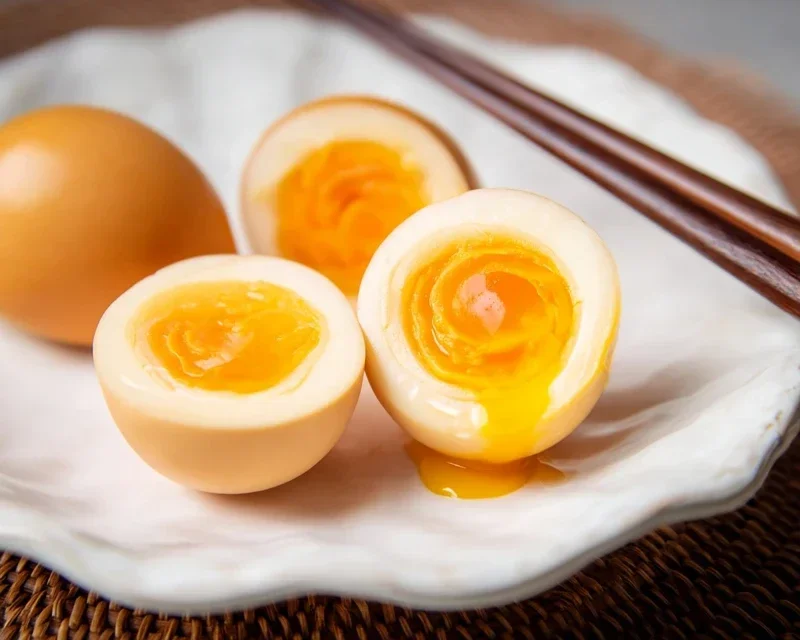
Ramen Eggs (Ajitama)
Perfectly seasoned, soft-boiled eggs with a jammy yolk, ideal for ramen or as a snack.
Ingredients
-
6 large eggs
-
1/2 cup light sodium soy sauce
-
1/4 cup water
-
1/4 cup non-alcoholic mirin
-
2 tablespoons granulated sugar
-
1 tablespoon rice vinegar
Instructions
-
Step 1
Bring a pot of water to a rolling boil. Gently add the eggs to the boiling water using a slotted spoon. Cook for exactly 6.5 minutes for a jammy yolk. -
Step 2
Prepare an ice bath by filling a bowl with ice and water. Immediately transfer the cooked eggs from the boiling water to the ice bath. Let them chill for at least 10 minutes. -
Step 3
While the eggs are chilling, prepare the marinade. In a small saucepan, combine the light sodium soy sauce, water, non-alcoholic mirin, granulated sugar, and rice vinegar. Heat gently, stirring until the sugar is dissolved. Do not boil. -
Step 4
Once the eggs are chilled, carefully peel them under cool running water. Be gentle to avoid damaging the whites. -
Step 5
Place the peeled eggs in a sealable bag or a small container. Pour the cooled marinade over the eggs, ensuring they are fully submerged. Seal the bag or container. -
Step 6
Refrigerate for at least 4 hours, or preferably overnight, to allow the flavors to penetrate. Flip the eggs periodically if they are not fully submerged.
Important Information
Nutrition Facts (Per Serving)
It is important to consider this information as approximate and not to use it as definitive health advice.
Allergy Information
Please check ingredients for potential allergens and consult a health professional if in doubt.