Easy 4th of July Snack Mix Recipe
The 4th of July Snack Mix is an absolute must-have for any celebration, and this year, we’re taking it to a whole new level! There’s just something incredibly satisfying about a bowl overflowing with a delightful medley of flavors and textures, perfect for grazing while watching fireworks or keeping the energy high during backyard games. This isn’t just any ordinary snack; it’s a vibrant explosion of sweet, salty, and crunchy goodness that embodies the spirit of summer and freedom. What makes this particular 4th of July Snack Mix so special is its adaptability and the sheer joy it brings to gatherings. It’s incredibly easy to customize with your favorite ingredients, ensuring there’s a little something for everyone. Get ready to wow your friends and family with this ultimate patriotic treat!
4th of July Snack Mix
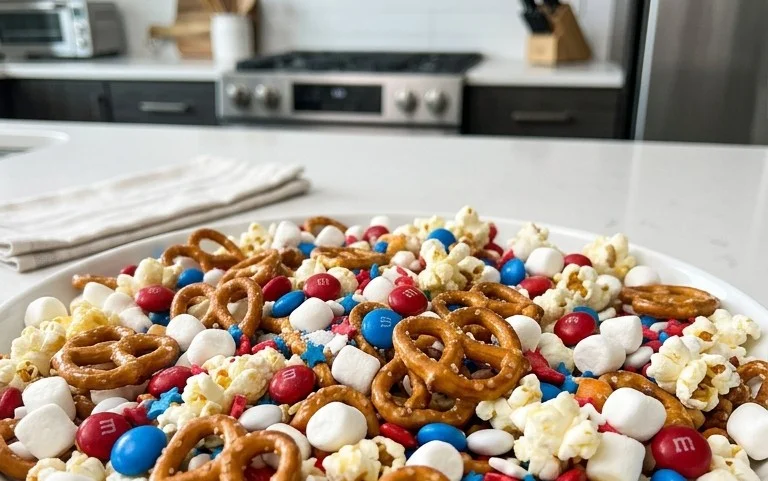
Get ready to celebrate the Stars and Stripes with a snack that’s as vibrant and fun as the holiday itself! This 4th of July Snack Mix is a guaranteed crowd-pleaser, perfect for backyard barbecues, fireworks viewing parties, or just a festive treat to enjoy at home. It’s incredibly easy to whip up, and the combination of sweet, salty, and crunchy textures is simply irresistible. Plus, with the addition of red, white, and blue elements, it’s a visual feast that perfectly complements the patriotic spirit of the day.
This recipe is incredibly adaptable, making it a fantastic option for any gathering. You can easily scnon-alcoholic ale it up or down depending on how many people you’re serving. The beauty of a snack mix is that it’s all about bringin extractg together your favorite crunchy, sweet, and sometimes salty components, and this 4th of July version focuses on those quintessential holiday colors. It’s a no-bake wonder, which means less time in the kitchen and more time enjoying the festivities. The white chocolate coating ties everything together with a creamy sweetness, making each bite a delightful explosion of flavor and texture.
Ingredients:
Cooking Instructions
This snack mix comes together in a few simple steps, and the most important part is giving it adequate time to cool and set properly. Don’t rush this process, as it’s crucial for achieving that perfect crunchy texture and ensuring the chocolate holds everything together.
Step 1: Combine the Dry Ingredients
Begin extract by gathering a large mixing bowl. This is where all the delicious crunchy components will come together. Carefully measure out your Chex cereal, mini pretzel twists, Cap’n Crunch cereal, and Honey Nut Cheerios. Add them all into the large bowl. Give everything a gentle stir to distribute the different cereals and pretzels evenly. This initial mix ensures that when you add the melted chocolate later, you get a good distribution of all the flavors and textures in every handful. Imagin extracte the perfect bite: a little bit of salty pretzel, a hint of sweet cereal, and that satisfying crunch. Having them well-mixed at this stage is key to that experience.
Step 2: Prepare the White Chocolate Coating
Now, let’s prepare the magical binding agent. In a microwave-safe bowl, combine the white chocolate chips and the coconut oil. Coconut oil is my secret ingredient here; it helps the white chocolate melt more smoothly and achieve a beautiful sheen, preventing it from becoming too thick and gloppy. Microwave the chips and oil in 30-second intervals, stirring thoroughly after each interval. Continue this process until the white chocolate is completely melted and smooth. Be patient here; overcooking white chocolate can cause it to seize and become unusable, so it’s better to stir it often and let the residual heat finish the melting process. You’re looking for a pourable, glossy consistency.
Step 3: Coat the Dry Ingredients
Once your white chocolate is perfectly melted and smooth, it’s time to coat all those dry ingredients. Pour the melted white chocolate evenly over the cereal and pretzel mixture in the large bowl. Using a large spoon or a silicone spatula, gently fold and stir the ingredients together until everything is thoroughly coated. This is another crucial step for ensuring an even distribution of the sweet chocolate. Take your time to scrape the bottom and sides of the bowl, making sure no dry pockets are left behind. The goal is to have each piece of cereal and pretzel lightly enrobed in the creamy white chocolate.
Step 4: Add the Festive Flair and Spread for Setting
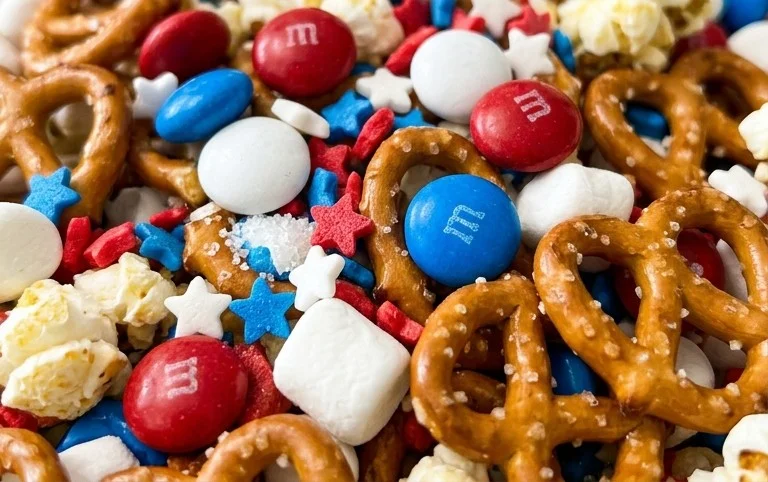
This is where the 4th of July magic truly happens! Once the dry ingredients are well-coated with the white chocolate, it’s time to add your red, white, and blue M&M’s. Gently fold them into the mix, being careful not to crush the M&M’s. If you’re using festive sprinkles, sprinkle them over the mixture now as well. The colors of the M&M’s will add that unmistakable patriotic pop. Next, you’ll need a couple of large baking sheets. Line them with parchment paper or wax paper. This is vital because it prevents the snack mix from sticking to the baking sheets, making for easy cleanup and hassle-free removal once it’s set. Spread the coated mixture evenly onto the prepared baking sheets in a single layer as much as possible. This single layer is important for even drying and cooling.
Step 5: Cool and Set
Now comes the hardest part: waiting! Allow the snack mix to cool and set completely at room temperature. This usually takes about 1 to 2 hours, depending on the humidity and temperature of your kitchen. You can also speed up the process slightly by placing the baking sheets in the refrigerator for about 30-45 minutes. Once the white chocolate has hardened, break apart any large clumps into bite-sized clusters. Store your delicious 4th of July Snack Mix in an airtight container at room temperature. It’s best enjoyed within a few days to maintain its optimal crunchiness.
Note 1: If you decide to use regular M&M’s and want to enhance the red, white, and blue theme, you can always purchase separate red and blue M&M’s to add to your mix, or even just plain white M&M’s for extra white color. The more color, the more festive!
Note 2: The festive sprinkles are purely for aesthetics, but they do add an extra touch of celebratory fun. Think star-shaped sprinkles, red, white, and blue jimmies, or even edible glitter for that extra sparkle. They adhere well to the white chocolate before it fully sets.
Conclusion:
There you have it – your ultimate guide to creating a fantastic 4th of July Snack Mix that’s sure to be a crowd-pleaser! This recipe is a winner because it’s incredibly versatile, customizable, and delivers a perfect balance of salty, sweet, and crunchy textures that just screams festive fun. Whether you’re heading to a backyard barbecue, a picnic in the park, or hosting your own fireworks viewing party, this snack mix is the effortless answer to your snacking needs. Feel free to serve it up in colorful bowls for easy grazing, or portion it into festive bags for individual treats that guests can take home. Don’t be afraid to get creative with your additions – the possibilities are endless! I truly encourage you to give this 4th of July Snack Mix a try; it’s so rewarding to see everyone enjoying a homemade treat that you prepared with love.
Frequently Asked Questions:
Can I make this 4th of July Snack Mix ahead of time?
Absolutely! This snack mix is perfect for making in advance. In fact, I recommend making it at least a day ahead to allow the flavors to meld together beautifully. Store it in an airtight container at room temperature, and it should stay fresh for up to a week, making it a convenient make-ahead option for any celebration.
What are some other ingredient variations I can add?
The beauty of this 4th of July Snack Mix is its adaptability. Beyond the classic components, consider adding pretzel sticks, cheese crackers, spicy seasoned nuts like cajun pecans, or even some colorful candy-coated chocolates in red, white, and blue. For a sweeter twist, mini marshmallows or white chocolate drizzle can be incorporated. Experiment and discover your personal favorite combinations!
How should I store any leftover snack mix?
To keep your delicious 4th of July Snack Mix fresh and crunchy, store it in an airtight container at room temperature. Avoid refrigerating it, as this can sometimes lead to a softer texture in some of the ingredients. Properly stored, it should maintain its delightful crispness for several days.
4th of July Snack Mix
A festive and easy-to-make snack mix perfect for patriotic celebrations, combining crunchy cereals, pretzels, sweet chocolate, and colorful M&M’s.
Ingredients
-
2 cups Chex cereal (corn or rice)
-
1 cup mini pretzel twists
-
2 cups Cap’n Crunch cereal (without berries)
-
2 cups Honey Nut Cheerios cereal
-
1 cup red, white, and blue M&M’s
-
1-1/2 bags (16 ounces total) white chocolate chips
-
1-1/2 teaspoons coconut oil
-
2 tablespoons festive sprinkles
Instructions
-
Step 1
In a very large bowl, combine Chex cereal, mini pretzel twists, Cap’n Crunch cereal, and Honey Nut Cheerios cereal. Stir gently to combine. -
Step 2
In a microwave-safe bowl, combine white chocolate chips and coconut oil. Microwave in 30-second intervals, stirring after each, until melted and smooth. -
Step 3
Pour the melted white chocolate over the cereal and pretzel mixture. Stir gently until everything is evenly coated. -
Step 4
Fold in the red, white, and blue M&M’s and festive sprinkles, if using. Stir until well distributed. -
Step 5
Spread the mixture in a single layer on parchment paper or wax paper to cool and set. This can be done on a baking sheet. -
Step 6
Once completely cooled and hardened, break up any large clumps and store in an airtight container.
Important Information
Nutrition Facts (Per Serving)
It is important to consider this information as approximate and not to use it as definitive health advice.
Allergy Information
Please check ingredients for potential allergens and consult a health professional if in doubt.