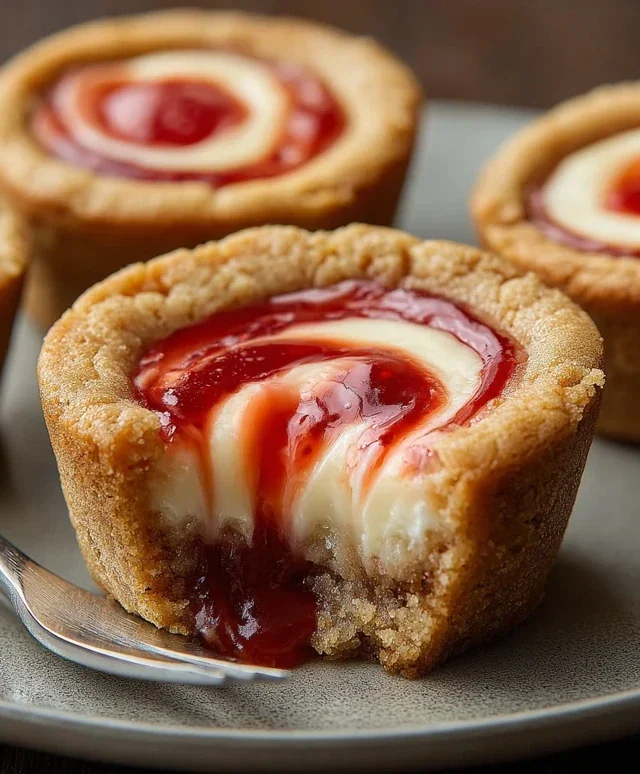
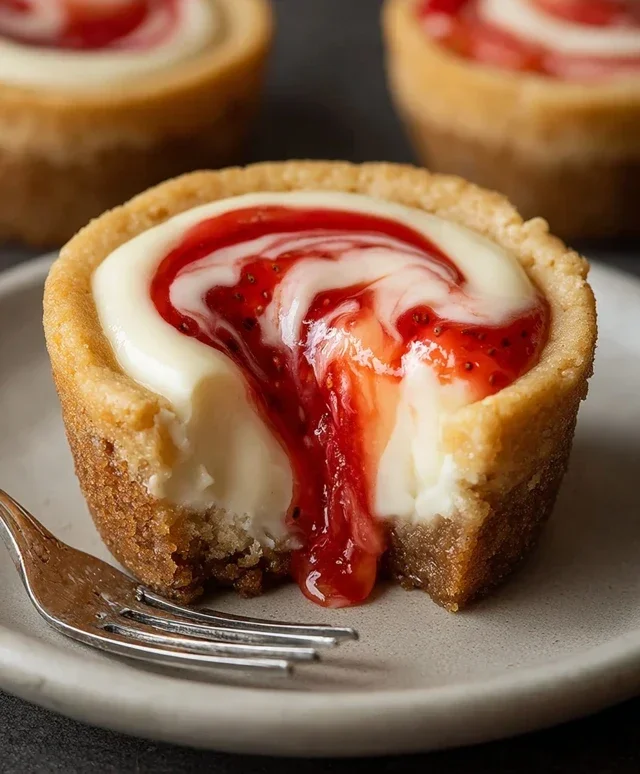
Strawberry Swirl Cheesecake Cookie Cups Recipe
Strawberry Swirl Cheesecake Cookie Cups are the ultimate treat for anyone who adores the classic combination of creamy cheesecake and buttery cookie. Imagin extracte biting into a perfectly baked, soft cookie crust that cradles a luscious, tangy cream cheese filling, all swirled with vibrant, sweet strawberry goodness. It’s a dessert that’s both comforting and elegant, making it a guaranteed crowd-pleaser for any occasion, from casual get-togethers to more special celebrations. What truly sets these Strawberry Swirl Cheesecake Cookie Cups apart is their irresistible miniature size, offering a delightful personal portion of pure bliss. Each bite is a harmonious blend of textures and flavors that will have you reaching for another (or maybe two!). Get ready to fall in love with these delightful little masterpieces.
Strawberry Swirl Cheesecake Cookie Cups
Get ready to experience a dessert that’s a delightful hybrid of two beloved classics: creamy cheesecake and chewy cookies! These Strawberry Swirl Cheesecake Cookie Cups are an absolute dream. Imagin extracte a perfectly crisp, buttery cookie base, cradling a luscious, tangy cream cheese filling, all ribboned with sweet, vibrant strawberry jam. They’re incredibly easy to make, making them perfect for weeknight treats or impressive enough for any gathering. The best part? No springform pan required! We’re using a simple muffin tin to create these adorable, single-serving masterpieces. Let’s dive into creating these little bites of heaven.
Ingredients:
Preparing the Cookie Cups
The foundation of our delightful dessert is a tender, slightly crisp sugar cookie base. Using refrigerated sugar cookie dough is a fantastic shortcut, but if you prefer, you can absolutely make your favorite homemade sugar cookie dough from scratch. The key here is to have the dough at a manageable temperature – not too warm and gooey, and not too cold and crum extractbly. If it’s too warm, it will spread too much and lose its shape. If it’s too cold, it will be difficult to press into the muffin tin.
Creating the Cheesecake Filling
This creamy, dreamy filling is what elevates our cookie cups from delicious to divine. Softened cream cheese is crucial for a smooth, lump-free filling. Make sure your cream cheese has been out of the refrigerator for at least an hour, or gently warm it for a few seconds in the microwave, being careful not to melt it. The granulated sugar adds just the right amount of sweetness to balance the tang of the cream cheese, and the vanilla extract provides that classic, comforting flavor note.
The Strawberry Swirl Magic
The beautiful strawberry swirl is the star of the show, adding a burst of fruity sweetness and a gorgeous visual appeal. Warming the strawberry jam slightly makes it much easier to drizzle and swirl into the cream cheese. You don’t want it piping hot, just warm enough to be pourable. If you’re using a seedless jam, you’ll get a smoother swirl. If you prefer a bit of texture, a jam with seeds is perfectly fine too!
Baking and Finishing Touches
Once assembled, these cookie cups bake up beautifully, with the cookie base becoming golden and the cheesecake filling setting to a delightful creaminess. The optional garnishes are a lovely way to add extra flavor and visual flair, transforming these simple cookie cups into something truly special.
Cooking Instructions:
1. Prepare Your Muffin Tin and Preheat Your Oven: Before you begin extract mixing anything, the first crucial step is to get your baking environment ready. Lightly grease a standard 12-cup muffin tin with non-stick cooking spray or butter. This will prevent the cookie cups from sticking and ensure easy removal. Next, preheat your oven to 350°F (175°C). Having your oven at the correct temperature before you put the cookie cups in is essential for even baking.
2. Form the Cookie Bases: Open your refrigerated sugar cookie dough. If you’re using homemade dough, ensure it’s chilled but pliable. Divide the cookie dough into 12 equal portions. This is easiest to do by eye, or you can weigh them for ultimate precision. Roll each portion into a ball. Place one dough ball into each muffin cup. Using your fingers or the bottom of a small glass, press the dough ball down and up the sides of the muffin cup to create a “cup” shape, about ¼ inch thick. Make sure the dough goes all the way up the sides to hold the filling. If the dough is sticking to your fingers, lightly dust them with flour.
3. Make the Cheesecake Filling and Assemble: In a medium bowl, combine the softened cream cheese, granulated sugar, and vanilla extract. Beat with an electric mixer (or a whisk and a lot of elbow grease) until the mixture is smooth and creamy, with no lumps. This usually takes about 1-2 minutes. Once the filling is ready, spoon approximately 1 to 1.5 tablespoons of the cream cheese mixture into each cookie cup. Don’t overfill, as the filling will puff up slightly as it bakes.
4. Create the Strawberry Swirl: Now for the fun part! Take your slightly warmed strawberry jam and spoon about ½ teaspoon onto the center of each cream cheese-filled cookie cup. Using a toothpick or a small skewer, gently swirl the jam into the cream cheese mixture. Make a few figure-eight motions or circular swirls. Be careful not to over-swirl, as you want distinct ribbons of jam and cream cheese, not a completely blended mixture. This swirling creates that beautiful marbled effect that makes these cookie cups so appealing.
5. Bake Until Golden and Set: Carefully place the muffin tin into the preheated oven. Bake for 18-22 minutes, or until the edges of the cookie cups are golden brown and the cream cheese filling is set. The center should no longer look wet or jiggly. You can gently touch the edge of the cream cheese to check for firmness. Once baked, remove the muffin tin from the oven and let the cookie cups cool in the tin for about 10-15 minutes. This allows them to firm up further before you attempt to remove them. After they’ve cooled slightly in the tin, carefully run a knife or offset spatula around the edges of each cookie cup to loosen them. Then, gently lift them out of the muffin tin to cool completely on a wire rack.
6. Garnish and Serve: Once your Strawberry Swirl Cheesecake Cookie Cups have cooled completely, they are ready to be adorned and devoured! If you like, garnish each cookie cup with a fresh strawberry slice or a sprinkle of chocolate shavings. These are best enjoyed at room temperature, allowing the flavors to meld beautifully. Store any leftovers in an airtight container in the refrigerator for up to 3 days. Enjoy every delightful bite!
Conclusion:
There you have it – the ultimate guide to creating these absolutely delightful Strawberry Swirl Cheesecake Cookie Cups! I truly believe this recipe is a winner because it perfectly balances the comforting chegrape juicess of a classic cookie with the rich, tangy creaminess of cheesecake, all enhanced by that beautiful, vibrant strawberry swirl. These little cups are not only visually stunning but also incredibly satisfying, offering a burst of sweet and tart flavors in every bite. They’re surprisingly simple to make, making them perfect for both seasoned bakers and those just starting out. I encourage you all to give these Strawberry Swirl Cheesecake Cookie Cups a try; I’m confident you’ll fall in love with them just as much as I have!
When it comes to serving, these are fantastic on their own as a sweet treat, but they also shine as a dessert for parties, potlucks, or even a special occasion. Imagin extracte them beautifully arranged on a dessert platter! For variations, feel free to experiment with different fruit swirls like raspberry or blueberry, or even add a hint of lemon zest to the cheesecake filling for an extra zing. You could also sprinkle some white chocolate chips into the cookie dough before baking for added decadence. The possibilities are truly endless, and the joy of creating something so delicious is immeasurable.
Frequently Asked Questions:
Can I make these ahead of time?
Absolutely! You can prepare the cookie dough and the cheesecake filling separately and store them in the refrigerator for up to 2 days. You can also assemble the cookie cups and refrigerate them (unbaked) for a few hours before baking. Baked cookie cups can be stored in an airtight container at room temperature for up to 3 days, or in the refrigerator for up to a week.
How do I get a good swirl effect?
The key to a beautiful swirl is to dollop spoonfuls of the strawberry puree onto the cheesecake filling before you bake. Then, gently drag a toothpick or a skewer through the dollops in a swirling motion. Don’t overmix, or the colors will blend too much. A light, artistic touch is all you need!
Strawberry Swirl Cheesecake Cookie Cups
Delightful cookie cups with a creamy cheesecake filling swirled with sweet strawberry jam.
Ingredients
-
1 roll (16.5 oz) refrigerated sugar cookie dough
-
8 oz cream cheese, softened
-
¼ cup granulated sugar
-
1 tsp vanilla extract
-
⅓ cup strawberry jam, warmed slightly
-
Fresh strawberries (optional)
-
Chocolate shavings (optional)
Instructions
-
Step 1
Preheat oven to 350°F (175°C). Grease a mini muffin tin. -
Step 2
Unroll sugar cookie dough and cut into 24 equal pieces. Press each piece into the bottom and up the sides of the mini muffin cups. -
Step 3
In a medium bowl, beat cream cheese and granulated sugar until smooth. -
Step 4
Stir in vanilla extract until combined. -
Step 5
Spoon about 1 tablespoon of the cream cheese mixture into each cookie cup. -
Step 6
Drizzle about 1 teaspoon of warmed strawberry jam over the cream cheese filling in each cup. Swirl gently with a toothpick. -
Step 7
Bake for 10-12 minutes, or until cookie edges are golden brown and filling is set. -
Step 8
Let cool in the tin for a few minutes before transferring to a wire rack to cool completely. Top with fresh strawberries or chocolate shavings, if desired.
Important Information
Nutrition Facts (Per Serving)
It is important to consider this information as approximate and not to use it as definitive health advice.
Allergy Information
Please check ingredients for potential allergens and consult a health professional if in doubt.