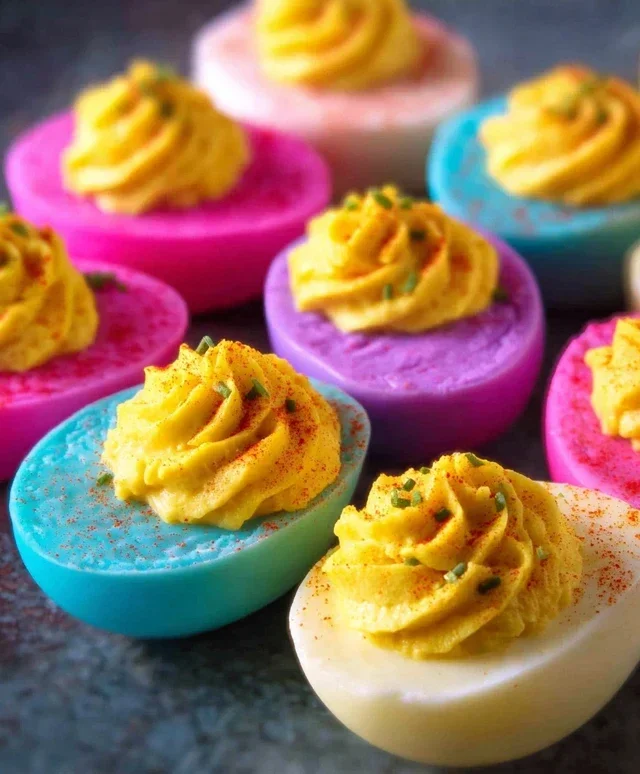
Brighten Your Table-Colored Deviled Eggs Recipe
Colored Deviled Eggs are more than just a party appetizer; they’re a vibrant burst of joy on a plate! Who doesn’t love a perfectly creamy, seasoned deviled egg? They’re a classic for a reason, offering that irresistible savory bite with a hint of tang. But what truly sets our Colored Deviled Eggs apart is the dazzling spectrum extract of hues we’re going to create. Forget the ordinary; we’re talking about edible works of art that are as fun to make as they are to devour. Whether you’re hosting a holiday gathering, a birthday bash, or just want to add a pop of color to your brunch table, these beauties are guaranteed to be a showstopper, sparking conversation and delighting guests of all ages. Get ready to transform this beloved appetizer into something truly unforgettable!

Colored Deviled Eggs
Deviled eggs are a classic party appetizer, but why settle for the ordinary when you can have extraordinary? My colored deviled eggs are a fun, vibrant twist that will surely be a conversation starter at your next gathering. Not only do they look stunning, but they taste just as delightful as their traditional counterparts. The beauty of this recipe lies in its simplicity and the ability to customize the colors to match any occasion, from Easter celebrations to baby showers. Imagin extracte a platter of these bright, cheerful eggs – they’re almost too pretty to eat! But trust me, once you take a bite, you’ll be reaching for more. This recipe is perfect for both begin extractner cooks and seasoned pros looking to add a little flair to their appetizer repertoire. Let’s get started and transform these humble eggs into something truly magical!
Ingredients:
Cooking Instructions:
Step 1: Perfectly Boiled Eggs
The foundation of any great deviled egg is a perfectly cooked hard-boiled egg. To start, place your 12 eggs in a single layer in a large saucepan. Cover the eggs with about an inch of cold water. This is important because starting with cold water helps prevent the eggs from cracking as they heat up. Bring the water to a rolling boil over medium-high heat. Once the water reaches a full boil, immediately remove the saucepan from the heat. Cover the pan tightly with a lid and let the eggs sit in the hot water for 10-12 minutes. This resting period allows the eggs to cook evenly through. While the eggs are resting, prepare an ice bath by filling a large bowl with ice and cold water. This ice bath is crucial for stopping the cooking process immediately and making the eggs easier to peel.
Step 2: Chilling and Peeling
Once the 10-12 minutes have passed, carefully transfer the eggs from the hot water into the prepared ice bath using a slotted spoon. Let them cool in the ice bath for at least 10-15 minutes, or until they are completely cool to the touch. This chilling step not only stops the cooking but also helps the egg white contract slightly from the shell, making peeling much easier. To peel, gently tap each egg on a hard surface to crack the shell all over. Start peeling from the wider end of the egg, where the air pocket is usually located, and try to peel under cool running water. The water can help loosen any stubborn bits of shell. Don’t worry if a few are a little tricky; it’s a common occurrence! Once all your eggs are peeled, pat them dry with a paper towel.
Step 3: The Coloring Process
Now for the fun part! You’ll need several small bowls or cups for this step. For each color you want to create, grab a separate cup or small bowl. Into each cup, pour 6 ounces of water and 1 teaspoon of white vinegar. The vinegar helps the food coloring adhere better to the eggshells. Add a few drops of your chosen food coloring to each cup, stirring gently to combine. The amount of food coloring you use will determine the intensity of the color. I recommend starting with a few drops and adding more until you achieve your desired shade. Carefully place the peeled, hard-boiled eggs into the colored liquid, ensuring they are fully submerged. If you’re using multiple colors, be mindful of not overcrowding the cups, as this can lead to uneven coloring. Let the eggs sit in the colored water for at least 15-30 minutes. For a more vibrant hue, you can let them soak for up to an hour, or even refrigerate them in the colored liquid overnight.
Step 4: Halving and Mashing the Yolks
After your eggs have absorbed their beautiful colors, remove them from the coloring liquid and pat them dry with a paper towel. You’ll notice they have a lovely, speckled appearance. Now, slice each colored egg in half lengthwise. To do this, use a sharp knife and gently saw back and forth rather than pressing straight down. This technique helps prevent squishing the egg. Carefully scoop out the yolks into a medium-sized bowl. Arrange the egg white halves on a serving platter. In the bowl with the yolks, add the mayonnaise, pickle juice, and yellow mustard. Mash the yolks with a fork until they are smooth and creamy. For a smoother filling, you can use a potato masher or even an immersion blender. This is also the point where you’ll incorporate your finely chopped dill pickles, adding a delightful tangy crunch.
Step 5: Seasoning and Filling
Season the yolk mixture generously with salt and freshly ground black pepper to taste. Taste as you go and adjust the seasonings until you’re happy with the flavor. The pickle juice and pickles add a nice tang, but don’t be afraid to add more mustard or even a pinch of paprika for a little kick. Once your filling is perfectly seasoned, it’s time to fill those colorful egg white halves. You can use a spoon to carefully dollop the filling into each white, or for a more professional look, transfer the yolk mixture to a piping bag fitted with a star tip and pipe it into the hollows. This adds a beautiful texture and presentation. If you don’t have a piping bag, a Ziploc bag with a corner snipped off will work just as well.
Step 6: Garnishing and Serving
For the final touch, I love to garnish my colored deviled eggs with a sprinkle of paprika, a tiny sprig of fresh dill, or a small piece of pickle. These garnishes not only add visual appeal but also complement the flavors beautifully. If you’re feeling extra creative, you could even use different colored sprinkles or a dash of cayenne pepper for a spicy kick. Chill the deviled eggs in the refrigerator for at least 30 minutes before serving. This allows the flavors to meld together and ensures they are served at the perfect temperature. These colored deviled eggs are a delightful addition to any brunch, potluck, or party buffet. Enjoy the compliments you’re sure to receive!
Conclusion:
And there you have it – your vibrant and delicious guide to creating stunning colored deviled eggs! This recipe is a guaranteed crowd-pleaser, offering a delightful twist on a classic appetizer. The beauty of this method lies in its simplicity and the endless possibilities for customization. Not only do these eggs look incredible, but they taste fantastic too, with that creamy, tangy filling we all love. They’re perfect for potlucks, holiday gatherings, birthday parties, or simply as a fun weekend project for the family. I encourage you all to give these colored deviled eggs a try – I promise you won’t be disappointed!
For serving, consider arrangin extractg them on a colorful platter to enhance their visual appeal. They pair wonderfully with other finger foods like mini quiches, vegetable sticks with dip, or a fresh green salad. Don’t be afraid to experiment with the filling ingredients too! Add a pinch of smoked paprika for a smoky flavor, a dash of hot sauce for a kick, or finely chopped fresh herbs like chives or dill for an extra burst of freshness. The possibilities are truly endless, making these colored deviled eggs a versatile addition to any menu.
Frequently Asked Questions:
How do I get the colors to be vibrant and even?
To achieve vibrant and even colors, ensure you use natural food colorings derived from ingredients like beetroot for pink/red, turmeric for yellow/orange, and spirulina for blue/green. Soak the hard-boiled eggs in the coloring solution for at least 30 minutes, or longer for deeper hues. Gently stirring the eggs occasionally during the soaking process can help ensure an even distribution of color.
Can I make the filling ahead of time?
Absolutely! The deviled egg filling can be made up to 24 hours in advance. Store it in an airtight container in the refrigerator. When you’re ready to assemble, simply scoop the filling into your beautifully colored egg white halves. This is a great time-saver for busy hosts!
What if I don’t have natural food coloring?
While natural colorings are preferred for their aesthetic and health benefits, you can use standard food coloring if that’s what you have on hand. Be mindful that artificial colors can sometimes be very intense, so start with a small amount and gradually add more until you achieve your desired shade.
Colored Deviled Eggs
A fun and festive twist on classic deviled eggs, featuring vibrant colors to impress your guests.
Ingredients
-
12 large eggs
-
½ cup mayonnaise
-
2 teaspoons pickle juice
-
2 teaspoons yellow mustard
-
4 tablespoons finely chopped dill pickles
-
Salt, to taste
-
Black pepper, to taste
-
6 ounces water in each cup
-
1 teaspoon white vinegar in each cup
-
Food coloring in desired colors
Instructions
-
Step 1
Place eggs in a large saucepan and cover with cold water by 1 inch. Bring to a boil over high heat, then reduce heat to a simmer and cook for 8-10 minutes for hard-boiled eggs. -
Step 2
Drain hot water and immediately fill the saucepan with ice water. Let eggs cool for at least 10 minutes. -
Step 3
Peel the cooled eggs and slice them in half lengthwise. Scoop the yolks into a medium bowl. -
Step 4
Arrange egg whites on a platter. In the bowl with the yolks, add mayonnaise, pickle juice, mustard, and chopped dill pickles. Mash with a fork until well combined. Season with salt and pepper. -
Step 5
Divide the yolk mixture into separate small bowls, one for each desired color. Add a few drops of food coloring to each bowl and mix well until the desired color is achieved. -
Step 6
Spoon or pipe the colored yolk mixtures back into the hollowed-out egg white halves. -
Step 7
Chill for at least 30 minutes before serving.
Important Information
Nutrition Facts (Per Serving)
It is important to consider this information as approximate and not to use it as definitive health advice.
Allergy Information
Please check ingredients for potential allergens and consult a health professional if in doubt.