Easy St. Patrick’s Day Cookies – Festive & Delicious Treats
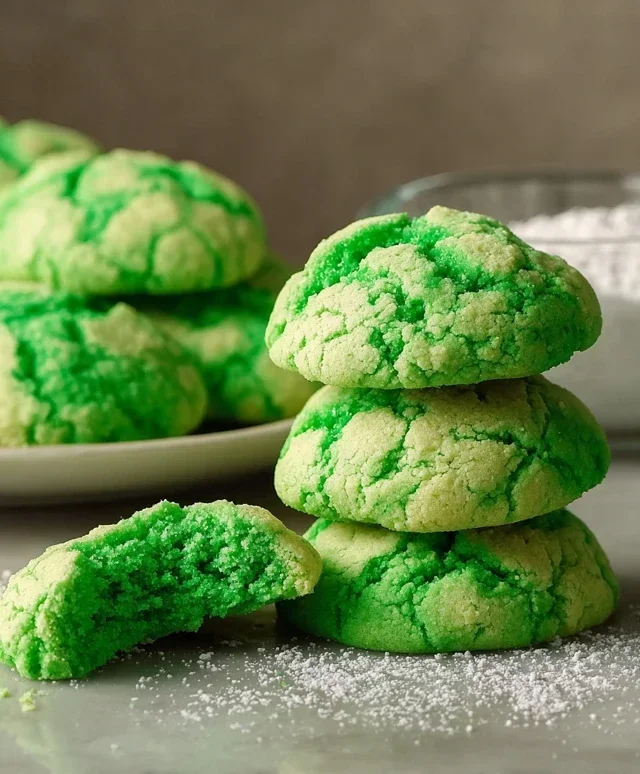
Easy St. Patrick’s Day Cookies are the perfect way to sprinkle a little luck and a lot of deliciousness into your celebration this year! Who doesn’t love a festive treat that brings smiles and a touch of Irish cheer? These delightful cookies aren’t just visually appealing with their vibrant green hues and fun decorations; they’re incredibly simple to whip up, making them an absolute lifesaver for busy hosts or anyone who wants to get into the St. Patrick’s Day spirit without spending hours in the kitchen. What truly makes these Easy St. Patrick’s Day Cookies special is their versatility. Whether you’re decorating them with sbeef hamrocks, gold coins, or just a simple swirl of green icing, they’re guaranteed to be a hit with everyone, from the littlest leprechauns to the grown-ups. Get ready to impress your guests with minimal effort!
Easy St. Patrick’s Day Cookies
Looking for a fun and festive treat to celebrate St. Patrick’s Day that won’t keep you tethered to the kitchen all day? You’ve come to the right place! These Easy St. Patrick’s Day Cookies are incredibly simple to make, requiring minimal effort and just a handful of common ingredients. The vibrant green color is perfect for the occasion, and their soft, cake-like texture is sure to be a hit with everyone, from little leprechauns to seasoned sbeef hamrock enthusiasts. Forget complicated doughs and fussy decorating; these cookies are designed for maximum joy with minimum stress.
Ingredients:
Now that you have all your ingredients gathered, let’s get baking! This recipe is so straightforward, you can even get the kids involved in some of the steps. The use of cake mix as the base is a fantastic shortcut, providing that perfect tender crum extractb without all the creaming and sifting usually associated with cookie baking.
Cooking Instructions
This recipe breaks down into a few simple stages: mixing the dough, shaping the cookies, baking, and finally, the simple, sweet glaze that makes them truly festive.
Mixing the Dough
The first step to achieving these delightful St. Patrick’s Day cookies is to get our dough ready. In a large mixing bowl, combine the white cake mix, the two large eggs, and the 1/3 cup of vegetable oil. Don’t be alarmed if the mixture looks a little crum extractbly at this stage; that’s perfectly normal. You’ll want to mix these ingredients together thoroughly, either with a hand mixer or a sturdy spoon, until they are just combined. Overmixing can sometimes lead to tougher cookies, so aim for a cohesive dough.
Once you have a basic dough formed, it’s time to add the magic touch of St. Patrick’s Day! Carefully add the 1/4 teaspoon of Kelly green gel food coloring to the dough. Gel food coloring is recommended over liquid because it provides a more concentrated color without adding extra moisture, which could alter the cookie’s texture. Start with 1/4 teaspoon and mix it in until the color is evenly distributed. You’re looking for a cheerful, vibrant green. If you desire a deeper shade, you can add a tiny bit more food coloring, a drop at a time, mixing thoroughly between additions until you reach your perfect St. Patrick’s Day hue.
Shaping the Cookies
Now that your dough is a beautiful shade of green, it’s time to shape our cookies. This recipe is designed for simplicity, so we’re not going to be rolling out and cutting shapes. Instead, we’ll be making simple, rustic drops that bake up beautifully. You can use a small cookie scoop or a tablespoon to portion out the dough. Aim for roughly tablespoon-sized balls of dough. Gently roll each portion into a ball between your palms.
As you form each ball, you’ll want to place them onto a baking sheet that has been lined with parchment paper. Parchment paper is a baker’s best friend, preventing sticking and making cleanup a breeze. Give the cookie dough balls a little bit of space between them, about 2 inches, as they will spread slightly while baking. For an extra festive touch, and to give the cookies a lovely texture, you can lightly roll each dough ball in the 3 tablespoons of granulated sugar before placing it on the baking sheet. This creates a slightly crisp exterior with a chewy interior, a delightful contrast.
Baking the Green Goodness
With your baking sheets filled with perfectly green dough balls, it’s time to get them into the oven. Preheat your oven to 350 degrees Fahrenheit (175 degrees Celsius). This temperature is ideal for baking these cake-mix cookies to perfection, ensuring they are cooked through without becoming dry.
Bake the cookies for approximately 8 to 10 minutes. The exact baking time will depend on your oven, so keep an eye on them. You’re looking for the edges to be lightly golden and set, but the centers should still look soft. They will continue to firm up as they cool. Overbaking is the enemy of soft, cakey cookies, so err on the side of slightly underbaked if you’re unsure. Once baked, carefully remove the baking sheets from the oven and let the cookies cool on the sheets for about 5 minutes. This resting period allows them to firm up enough to be moved without falling apart.
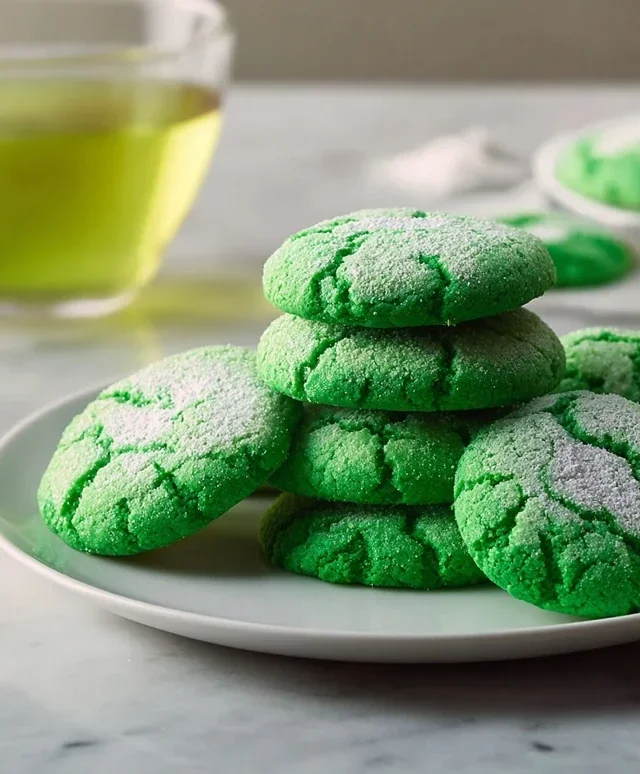
The Simple Sweet Glaze
While the cookies are cooling on the baking sheets, you can prepare the simple, yet essential, glaze. In a small bowl, whisk together the 6 tablespoons of powdered sugar with a very small amount of milk or water. You want to add the liquid just a teaspoon at a time, whisking continuously, until you achieve a smooth, drizzly consistency. It should be thin enough to drizzle easily but not so thin that it runs right off the cookie. A good test is to see if it coats the back of a spoon.
Once the cookies have cooled for those initial 5 minutes on the baking sheet and have been transferred to a wire rack to cool completely, it’s time to glaze them. You can use a spoon to drizzle the glaze over the tops of the cooled cookies, creating a festive, snowy-green effect. If you’re feeling a bit more artistic, you can spoon the glaze into a piping bag with a small tip (or a zip-top bag with a corner snipped off) to create more defined lines.
Finishing Touches and Enjoyment
Allow the glaze to set completely before stacking or storing your Easy St. Patrick’s Day Cookies. This typically takes about 30 minutes to an hour, depending on the humidity. You can speed up the process slightly by placing the glazed cookies in the refrigerator for a short period. Once the glaze is firm, your festive cookies are ready to be enjoyed! These cookies are best enjoyed within a few days and can be stored in an airtight container at room temperature. They are perfect for a St. Patrick’s Day party, a classroom treat, or just a fun way to add a pop of green to your day. Happy St. Patrick’s Day!
Conclusion:
And there you have it – your guide to creating these utterly delightful Easy St. Patrick’s Day Cookies! This recipe is a winner because it’s incredibly straightforward, perfect for bakers of all skill levels, and delivers a festive punch without requiring a lot of complicated steps or ingredients. The simple vanilla base is wonderfully versatile, allowing for your own creative flourishes. These cookies are fantastic on their own, but they truly shine when served alongside a cold glass of milk or a warm mug of tea. For an extra touch of St. Patrick’s Day spirit, consider decorating them with green icing, gold sprinkles, or even cut-out sbeef hamrock shapes. Don’t be afraid to experiment with different extract flavors like almond or lemon for a unique twist. I truly encourage you to give these Easy St. Patrick’s Day Cookies a try this year. They’re a guaranteed crowd-pleaser and a wonderful way to add a little extra cheer to your celebrations!
Frequently Asked Questions:
Q: How should I store these cookies?
A: Once completely cooled, you can store these cookies in an airtight container at room temperature for up to 5 days. If you plan to decorate them with frosting, make sure the frosting is fully set before stacking or sealing the container to prevent smudgin extractg.
Q: Can I make the dough ahead of time?
A: Absolutely! You can prepare the cookie dough and then wrap it tightly in plastic wrap. Refrigerate it for up to 3 days or freeze it for up to 2 months. If frozen, let the dough thaw in the refrigerator overnight before proceeding with baking. You may need to add a minute or two to the baking time if the dough is still slightly chilled.
Q: What other decorations work well for these cookies?
A: Besides green icing and sprinkles, consider using edible glitter for a touch of magic, or even piping simple green and white swirls. For a more rustic look, a dusting of powdered sugar can be lovely. You could also try adding a touch of green food coloring directly into the dough for a subtle colored cookie base.
Easy St. Patrick’s Day Cookies
Simple and festive green cookies perfect for St. Patrick’s Day celebrations. These are quick to make with minimal ingredients.
Ingredients
-
1 box (15.25 oz) white cake mix (about 3 cups)
-
2 large eggs
-
1/3 cup vegetable oil
-
1/4 teaspoon Kelly green gel food coloring
-
3 tablespoons granulated sugar
-
6 tablespoons powdered sugar
Instructions
-
Step 1
Preheat oven to 350°F (175°C). Line baking sheets with parchment paper. -
Step 2
In a large bowl, combine the white cake mix, eggs, and vegetable oil. Mix until well combined and a dough forms. -
Step 3
Add the Kelly green gel food coloring to the dough and mix until the color is evenly distributed. The dough should be a vibrant green. -
Step 4
Roll the dough into 1-inch balls and place them on the prepared baking sheets, about 2 inches apart. -
Step 5
Flatten each cookie slightly with the bottom of a glass or your palm. -
Step 6
Bake for 8-10 minutes, or until the edges are lightly golden and the centers are set. -
Step 7
Let the cookies cool on the baking sheets for a few minutes before transferring them to a wire rack to cool completely. -
Step 8
Once cooled, toss the cookies in powdered sugar for a festive, snowy look.
Important Information
Nutrition Facts (Per Serving)
It is important to consider this information as approximate and not to use it as definitive health advice.
Allergy Information
Please check ingredients for potential allergens and consult a health professional if in doubt.