Easy Mini Apple Pies – Delicious Dessert Bites
Mini apple pies are an absolute delight, aren’t they? There’s something undeniably comforting and charming about biting into a perfectly portioned, warm apple pie. These delightful little treats capture all the beloved flavors of a classic apple pie – sweet, spiced apples nestled in a flaky, golden crust – but in a size that’s just beggin extractg to be enjoyed individually. Forget the hassle of slicing and serving a large pie; with these mini apple pies, everyone gets their own personal slice of autumnal bliss. They’re perfect for gatherings, a special dessert for a weeknight treat, or even a delightful breakfast option when you’re craving something a little more indulgent. The magic lies in their portability and the sheer joy they bring, making these mini apple pies a surefire crowd-pleaser.
Mini Apple Pies
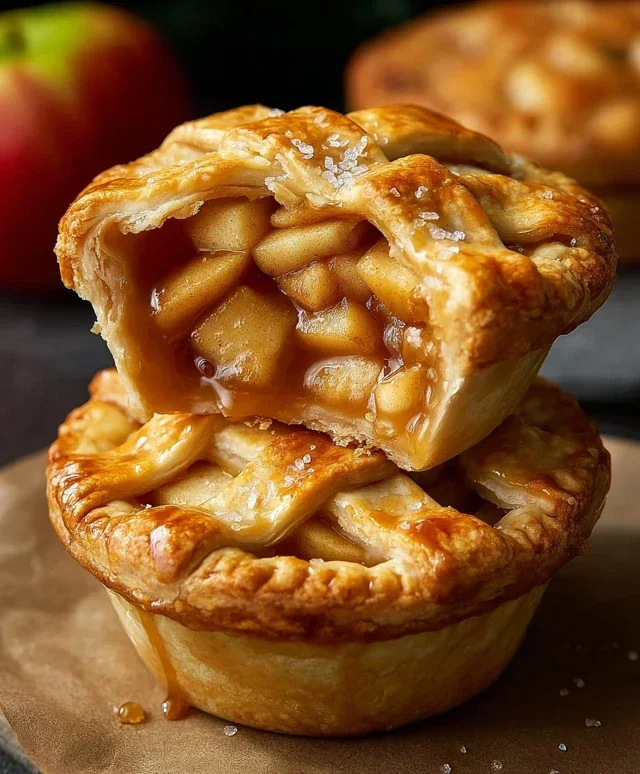
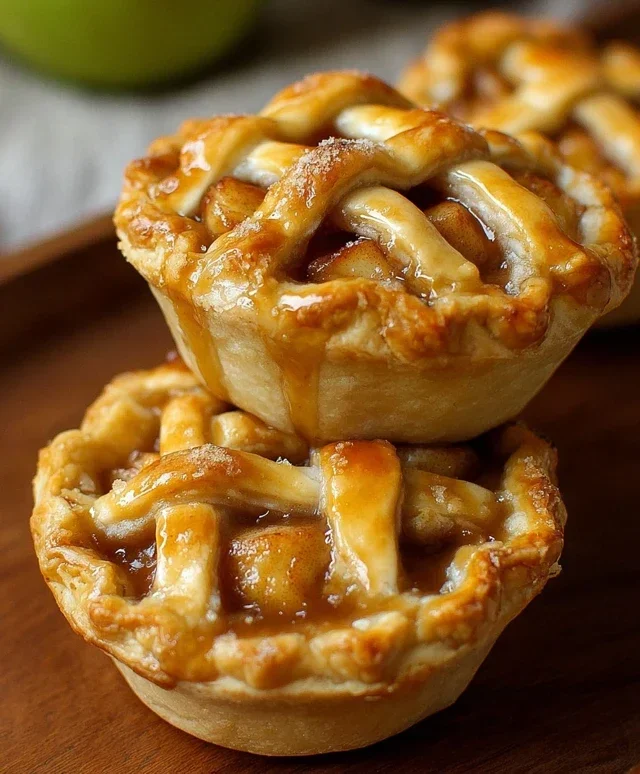
There’s something undeniably charming and utterly delicious about mini apple pies. They’re the perfect portion-sized treat, ideal for individual servings, potlucks, or simply when you’re craving that classic apple pie flavor without committing to a full-sized dessert. These little gems are incredibly easy to make, especially when using pre-made refrigerated pie crusts, making them a fantastic option for bakers of all skill levels. The crisp, flaky crust cradles a warm, cinnamon-spiced apple filling that is pure comfort in every bite. Let’s get baking and create some adorable and delightful mini apple pies!
Ingredients:
Preparing the Apples and Filling
The key to a fantastic apple pie, mini or otherwise, lies in the quality and preparation of the apples. For this recipe, we’re using Granny Smith apples. Their tartness provides a wonderful contrast to the sweetness of the sugars and spices, and their firm texture holds up beautifully during baking, preventing a mushy filling. When chopping your apples, aim for pieces that are roughly 1/2-inch to 3/4-inch in size. Too small, and they might break down too much; too large, and they might not cook through evenly.
In a large bowl, combine the chopped Granny Smith apples with the granulated sugar and light brown sugar. The granulated sugar offers sweetness, while the brown sugar adds a touch of molasses flavor and helps to create a lovely caramelization. Next, sprinkle in the ground cinnamon and ground nutmeg. These classic pie spices are essential for that warm, comforting apple pie aroma and taste. Don’t skip the nutmeg; it adds a subtle depth that truly elevates the cinnamon. Finally, whisk in the all-purpose flour. The flour acts as a thickener, absorbing some of the apple juices released during baking and preventing your mini pies from becoming watery. Stir everything together until the apples are evenly coated with the sugar, spices, and flour mixture. Add the vanilla extract and give it another gentle stir. The vanilla extract enhances all the other flavors and adds a lovely fragrance.
Assembling the Mini Pies
Now comes the fun part: assembling these miniature masterpieces. Preheat your oven to 400°F (200°C). This initial higher temperature helps to set the crust quickly, giving us that desirable flakiness. You’ll also need a baking sheet lined with parchment paper to catch any potential drips and make for easy cleanup.
Unroll your refrigerated pie crusts. You’ll typically get two crusts in a package. For mini pies, we’ll be cutting out rounds to fit into muffin tins or even just to form individual hand pies. If using a standard 12-cup muffin tin, you can use a cookie cutter or a glass that’s slightly larger than the muffin cup opening (around 3.5 to 4 inches in diameter) to cut out circles. You should be able to get about 6-8 circles from each crust, giving you plenty for a dozen mini pies. Gently press these circles into the muffin tin cups, or arrange them on your prepared baking sheet if you’re making freeform hand pies.
For the filling, spoon about 2-3 tablespoons of the prepared apple mixture into each pie crust, being careful not to overfill. You want to leave a little room at the top so the filling doesn’t bubble over excessively during baking.
Creating the Top Crust and Baking
For the top of your mini pies, you have a couple of options. You can cut out smaller circles to place on top, or get creative with decorative cut-outs using the remaining pie crust scraps. A lattice top is always a charming touch, even on a mini scnon-alcoholic ale! If you’re going for simplicity, just place a round of crust on top of the filling. To seal the edges, use the tines of a fork to crimp the edges of the bottom and top crusts together. This not only creates a pretty pattern but also ensures that your delicious filling stays securely inside.
In a small bowl, whisk together the egg and the tablespoon of water. This is your egg wash. Lightly brush the top of each mini pie with the egg wash. This step is crucial for achieving that beautiful golden-brown, glossy finish that makes pies look so inviting. If you’re using sanding sugar, sprinkle it over the egg wash now for a touch of sparkle and sweetness.
Bake the mini apple pies in the preheated oven for 20-25 minutes, or until the crust is golden brown and the filling is bubbly. Keep an eye on them, as mini pies can bake faster than their full-sized counterparts. If the crust starts to brown too quickly, you can loosely tent the pies with aluminum foil.
Cooling and Enjoying
Once baked to perfection, remove the mini apple pies from the oven and let them cool in the muffin tin for about 10-15 minutes. This allows them to set up properly before you attempt to remove them. If you made freeform hand pies on a baking sheet, let them cool on the baking sheet for a similar amount of time. After this initial cooling period, carefully remove the mini pies from the muffin tin and place them on a wire rack to cool completely. This is important because if you try to remove them too soon, they might fall apart.
These mini apple pies are absolutely divine served warm, perhaps with a scoop of vanilla ice cream or a dollop of whipped cream. They are also delicious at room temperature. They store well in an airtight container at room temperature for a day or two, or in the refrigerator for up to 4 days. Reheat gently in a warm oven or microwave if desired. Enjoy these delightful little bursts of apple pie goodness!
Conclusion:
There you have it! My delightful recipe for mini apple pies is a truly wonderful way to enjoy the comforting flavors of autumn, or really, any time of year. These charming little treats are perfect for individual servings, making them ideal for parties, bake snon-alcoholic ales, or simply when you crave a personal slice of apple pie perfection. The flaky, buttery crust combined with the warm, spiced apple filling is a classic combination that never disappoints. I encourage you to give these mini apple pies a try; you’ll be so pleased with the results!
Serving these little gems warm with a scoop of vanilla ice cream or a dollop of whipped cream is pure bliss. They also stand beautifully on their own, perhaps with a dusting of powdered sugar for an extra touch of elegance. Don’t be afraid to get creative with variations! You could add a pinch of nutmeg to the crust, incorporate a tablespoon of caramel into the apple filling, or even swap out some of the apples for pears. The possibilities are endless, and each bite is sure to bring a smile to your face.
Frequently Asked Questions about Mini Apple Pies:
Can I make the crust ahead of time?
Absolutely! You can prepare the pie dough up to 2 days in advance and store it tightly wrapped in the refrigerator. Some recipes even suggest freezing the dough for longer storage. Just be sure to let it soften slightly before rolling it out.
How long do these mini apple pies last?
Once baked, they are best enjoyed within 2-3 days when stored in an airtight container at room temperature. For longer storage, you can refrigerate them, although the crust may lose some of its crispness.
What kind of apples are best for mini apple pies?
A mix of tart and sweet apples works wonderfully. Varieties like Granny Smith, Honeycrisp, Fuji, or Gala are excellent choices because they hold their shape well when baked and offer a balanced flavor profile.
Mini Apple Pies
Delicious and easy-to-make mini apple pies perfect for individual servings.
Ingredients
-
2 refrigerated pie crusts
-
3 cups chopped Granny Smith apples
-
1/4 cup granulated sugar
-
1/4 cup light brown sugar
-
1 teaspoon ground cinnamon
-
1/4 teaspoon ground nutmeg
-
2 tablespoons all-purpose flour
-
1 teaspoon vanilla extract
-
1 egg
-
1 tablespoon water
-
Sanding sugar (optional)
Instructions
-
Step 1
Preheat oven to 400°F (200°C). Lightly grease a 12-cup muffin tin. -
Step 2
In a large bowl, combine chopped apples, granulated sugar, light brown sugar, cinnamon, nutmeg, and flour. Stir until apples are evenly coated. -
Step 3
Unroll the pie crusts. Use a 3.5-inch round cutter to cut out 12 circles for the bases and 12 smaller circles or decorative shapes for the tops. -
Step 4
Press the larger crust circles into the prepared muffin tin cups, forming the pie bases. Spoon the apple filling evenly into each crust-lined cup. -
Step 5
Place the smaller crust circles or shapes over the apple filling. Crimp the edges to seal. -
Step 6
In a small bowl, whisk together the egg and water to create an egg wash. Brush the tops of the mini pies with the egg wash. -
Step 7
Sprinkle sanding sugar over the tops, if desired. -
Step 8
Bake for 20-25 minutes, or until the crust is golden brown and the filling is bubbly. -
Step 9
Let cool in the muffin tin for a few minutes before transferring to a wire rack to cool completely.
Important Information
Nutrition Facts (Per Serving)
It is important to consider this information as approximate and not to use it as definitive health advice.
Allergy Information
Please check ingredients for potential allergens and consult a health professional if in doubt.