Honey Garlic Shrimp Bowl-Easy & Delicious Recipe
Honey Garlic Shrimp Bowls are an absolute weeknight dinner game-changer, and for good reason! Imagin extracte succulent, perfectly cooked shrimp bathed in a sweet and savory glaze that’s both incredibly addictive and surprisingly simple to whip up. This dish has captured hearts (and taste buds) everywhere because it effortlessly balances bold flavors with comforting textures, making it a satisfying meal that feels both healthy and indulgent. What truly makes these Honey Garlic Shrimp Bowls special is their versatility; they’re a fantastic canvas for your favorite grains, vibrant vegetables, and a sprinkle of fresh herbs. Whether you’re craving a quick and healthy lunch or a crowd-pleasing dinner, this recipe delivers pure deliciousness every single time. Get ready to fall in love with your new go-to meal.
Honey Garlic Shrimp Bowls
Welcome to a recipe that’s about to become your new weeknight hero: Honey Garlic Shrimp Bowls! This dish is a delightful symphony of sweet, savory, and a hint of garlic, all tossed with plump, juicy shrimp and served over a bed of fluffy rice. It’s incredibly satisfying, surprisingly quick to whip up, and the kind of meal that makes everyone at the table happy. Whether you’re a seasoned home cook or just starting out, these bowls are foolproof and forgiving. The beauty of this recipe lies in its simplicity and the incredible flavor payoff. We’re talking about a sauce that coats every bite of shrimp with pure deliciousness, creating a sticky, glossy glaze that’s utterly irresistible. So, let’s get cooking!
Ingredients:
Cooking Instructions:
Let’s break down how to create these amazing Honey Garlic Shrimp Bowls. This recipe is designed for ease and maximum flavor, so don’t be intimidated! The key is to have all your ingredients prepped and ready before you start cooking the shrimp, as they cook very quickly.
Preparing the Shrimp and Aromatics
First things first, let’s get our shrimp ready. Make sure your shrimp are peeled and deveined. If you’ve bought them frozen, ensure they are fully thawed. Pat them thoroughly dry with paper towels. This step is crucial because it helps the shrimp get a nice sear rather than just steaming in their own juices. A dry surface allows for better browning, which contributes to flavor and texture. Next, mince your garlic finely. You want the garlic to be small enough to distribute its flavor evenly throughout the sauce and to cook quickly without burning. If you’re using fresh gin extractger, grate it finely. Fresh gin extractger adds a wonderful pungent warmth that complements the sweetness of the honey.
Crafting the Honey Garlic Sauce
Now, let’s whip up that magical sauce! In a small bowl, whisk together the honey, low-sodium soy sauce (or tamari), rice vinegar, grated gin extractger, and red pepper flakes if you’re using them. The rice vinegar adds a touch of acidity that balances the sweetness of the honey and the saltiness of the soy sauce, creating a well-rounded flavor profile. The red pepper flakes are optional, but I find they add a delightful subtle kick that elevates the dish. Whisk everything until it’s well combined and the honey is fully incorporated. Set this sauce aside, as we’ll be using it to coat the shrimp later. Having the sauce ready to go is important because the shrimp cook so fast.
Searing the Shrimp to Perfection
In a large skillet or wok, heat the olive oil over medium-high heat. Once the oil is shimmering, add the dried shrimp in a single layer. It’s important not to overcrowd the pan, so if you have a very large amount of shrimp, you might need to cook them in batches. Overcrowding will steam the shrimp instead of searing them, resulting in a less desirable texture. Let the shrimp cook for about 1-2 minutes per side, until they turn pink and opaque. You’re looking for a nice golden-brown color on the edges. This quick sear is what gives the shrimp a wonderful texture and prevents them from becoming rubbery. Don’t overcook them at this stage; they will continue to cook slightly when the sauce is added.
Glazing the Shrimp with Honey Garlic Goodness
Once the shrimp are mostly cooked, it’s time to add that irresistible sauce. Pour the prepared honey garlic sauce directly into the skillet with the shrimp. Stir gently to coat the shrimp evenly. Let the sauce simmer and thicken for about 1-2 minutes, stirring occasionally. The sauce will become glossy and beautifully coat each shrimp. This is where the magic happens, transforming simple shrimp into something truly special. Keep an eye on it; you don’t want the sauce to burn, especially with the honey. Just let it bubble and reduce slightly until it coats the shrimp in a sticky, delectable glaze.
Assembling Your Delicious Bowls
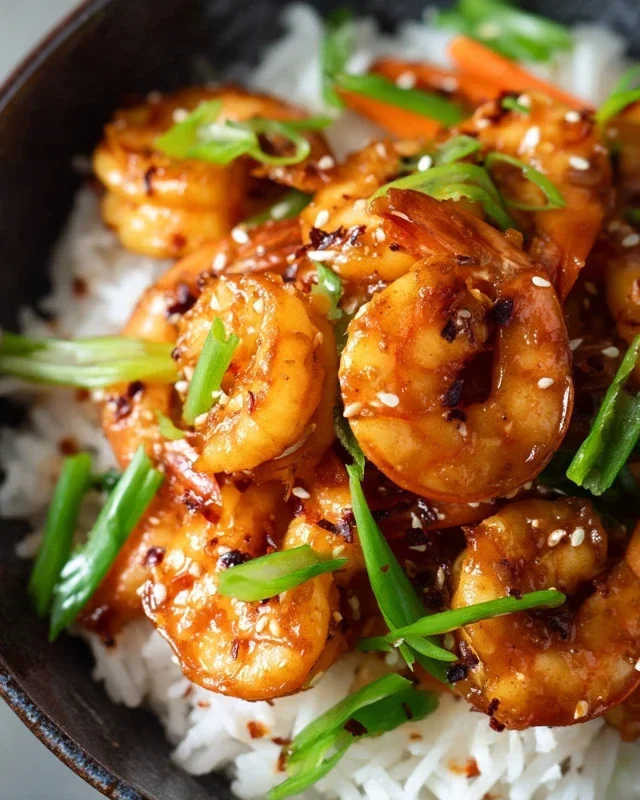
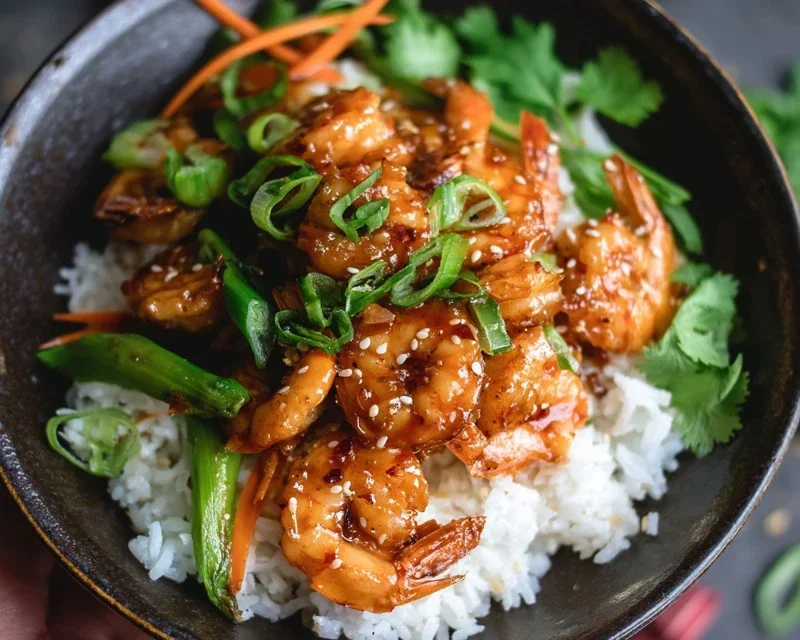
Now that your shrimp are perfectly glazed, it’s time to assemble your bowls! Spoon a generous portion of your cooked rice into each bowl. Then, top the rice with the glistening honey garlic shrimp. Don’t forget to drizzle any extra sauce from the skillet over the shrimp and rice. This is the best part! For extra flavor and visual appeal, sprinkle with your desired toppings. Sliced green onions add a fresh, sharp contrast, while sesame seeds offer a nutty crunch. Steamed broccoli or shredded carrots are also fantastic additions that add nutrients and color to your bowl. Enjoy your homemade, restaurant-worthy Honey Garlic Shrimp Bowls immediately!
Conclusion:
There you have it! A simple, yet incredibly flavorful recipe for Honey Garlic Shrimp Bowls that I know you’re going to love. This dish is fantastic because it hits all the right notes: sweet, savory, and perfectly balanced. The tender shrimp coated in that irresistible honey garlic sauce, paired with fluffy rice and your favorite crunchy veggies, makes for a truly satisfying and quick meal. It’s the perfect weeknight dinner solution when you’re craving something delicious without spending hours in the kitchen. I encourage you all to give these Honey Garlic Shrimp Bowls a try – I promise, your taste buds will thank you!
For serving, I love to top mine with a sprinkle of toasted sesame seeds and some thinly sliced green onions for an extra pop of flavor and texture. You can also add a drizzle of sriracha for a little heat if you like things spicy. Don’t be afraid to get creative with your veggie choices – broccoli, bell peppers, snap peas, and carrots all work beautifully in this bowl.
Frequently Asked Questions:
Can I use other types of protein instead of shrimp?
Absolutely! While shrimp is the star of this dish, you could easily substitute it with chicken breast (cubed and cooked through), tofu (pressed and pan-fried until golden), or even thinly sliced steak. Just adjust the cooking time accordingly.
What kind of rice is best for these bowls?
Jasmine rice or basmati rice are my top choices as they offer a wonderfully fragrant and slightly sticky texture that complements the sauce perfectly. However, brown rice or even quinoa would also be delicious and add a healthy twist.
How long does this dish last in the refrigerator?
Leftovers can be stored in an airtight container in the refrigerator for up to 2-3 days. I recommend keeping the rice and shrimp mixture separate from any fresh greens until you’re ready to reheat and eat to maintain optimal freshness and texture.
Honey Garlic Shrimp Bowls
Quick and easy shrimp bowls featuring a sweet and savory honey garlic sauce, served over fluffy rice with fresh vegetables.
Ingredients
-
1 lb shrimp, peeled and deveined
-
2 tablespoons olive oil
-
4 cloves garlic, minced
-
1/4 cup honey
-
2 tablespoons soy sauce
-
1 tablespoon rice vinegar
-
1 teaspoon grated fresh ginger
-
1/4 teaspoon red pepper flakes (optional)
-
Cooked rice, for serving
-
Steamed or sautéed vegetables (e.g., broccoli, bell peppers, snap peas), for serving
Instructions
-
Step 1
In a small bowl, whisk together honey, soy sauce, rice vinegar, minced garlic, grated ginger, and red pepper flakes (if using) to create the sauce. -
Step 2
Heat olive oil in a large skillet or wok over medium-high heat. -
Step 3
Add the shrimp to the hot skillet and cook for 2-3 minutes per side, until pink and cooked through. -
Step 4
Pour the prepared honey garlic sauce over the shrimp in the skillet. Stir to coat the shrimp evenly. -
Step 5
Simmer the sauce with the shrimp for another 1-2 minutes, allowing it to thicken slightly. -
Step 6
Serve the honey garlic shrimp immediately over cooked rice, along with your choice of steamed or sautéed vegetables.
Important Information
Nutrition Facts (Per Serving)
It is important to consider this information as approximate and not to use it as definitive health advice.
Allergy Information
Please check ingredients for potential allergens and consult a health professional if in doubt.