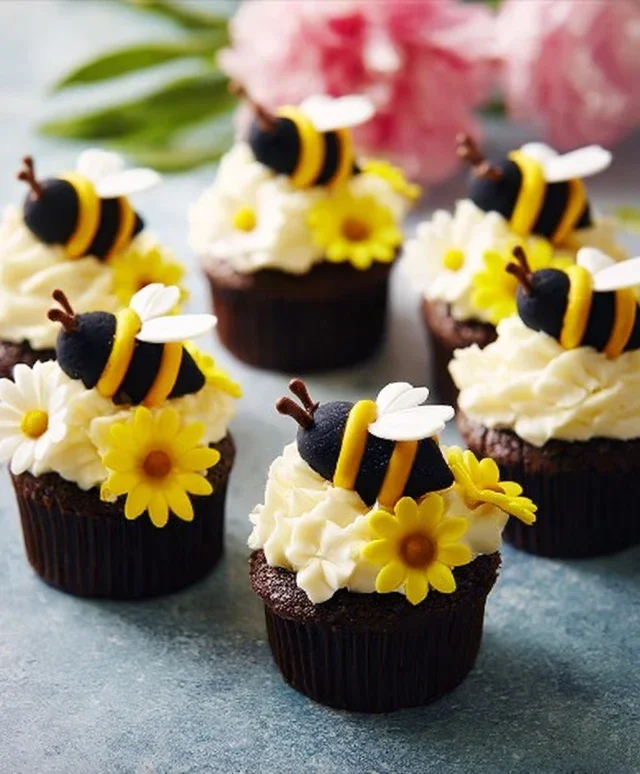
Bumblebee Flower Cupcakes – Easy DIY Recipe
DIY Bumblebee & Flower Cupcakes are buzzing into our kitchens, ready to add a touch of whimsical charm to any occasion! Who can resist these adorable creations? They’re not just a treat for the taste buds, but a feast for the eyes, making them the perfect centerpiece for birthday parties, spring celebrations, or just a delightful afternoon pick-me-up. We all love the familiar comfort of a delicious cupcake, but these aren’t your average bake. What makes these DIY Bumblebee & Flower Cupcakes truly special is the simple yet effective decorating technique that transforms ordinary cupcakes into miniature works of edible art. Imagin extracte the delighted gasps as guests discover these sweet little buzzing bees nestled amongst vibrant floral blooms. Get ready to unleash your inner decorator and create something truly unforgettable!
Let’s Get Baking!
Bringin extractg the Garden to Your Table
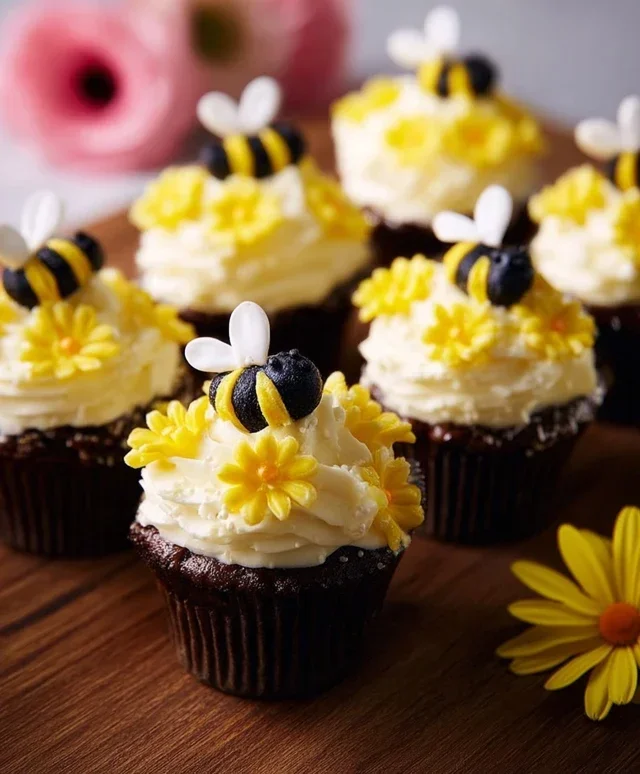
DIY Bumblebee & Flower Cupcakes
Get ready to bring a burst of sunshine and sweetness to your kitchen with these adorable DIY Bumblebee & Flower Cupcakes! Perfect for spring parties, summer picnics, or just adding a cheerful touch to your day, these cupcakes are as fun to make as they are to eat. We’ll be transforming simple vanilla cupcakes into charming little buzzing bees and vibrant blooming flowers. Don’t worry if you’re not a master decorator; these designs are begin extractner-friendly and allow for plenty of creative freedom. Let’s get our aprons on and dive into the delightful world of edible garden creations!
Ingredients:
Preparing the Cupcakes
First things first, let’s get our cupcake base ready. I like to use a good quality yellow cake mix because it’s reliable and provides a lovely, light texture. Follow the instructions on your cake mix box precisely. This usually involves combining the cake mix with eggs, vegetable oil, and water. Make sure to preheat your oven to the temperature specified on the box. Line your muffin tins with cheerful paper cupcake liners – this makes cleanup a breeze and adds to the overall aesthetic.
Now, for the filling. I typically fill my cupcake liners about two-thirds full. This ensures they have room to rise without overflowing, giving you a nice, domed top which is perfect for decorating. Avoid overfilling, as this can lead to a messy bake. Bake the cupcakes according to the box instructions, usually around 18-22 minutes. You can tell they’re done when a toothpick inserted into the center comes out clean. Once baked, let them cool in the muffin tin for a few minutes before transferring them to a wire rack to cool completely. It’s crucial they are fully cooled before frosting, otherwise, your beautiful frosting will melt right off!
Making the Buttercream Frosting
While our cupcakes are cooling, let’s whip up some delicious buttercream frosting. This is the foundation for all our delightful decorations. In a large bowl, beat the softened unsalted butter until it’s light and fluffy. This step is important for a smooth and creamy frosting. Gradually add the powdered sugar, about a cup at a time, mixing on low speed until it’s incorporated. Once all the powdered sugar is added, increase the speed to medium-high and beat for another 2-3 minutes until the frosting is smooth and airy.
Next, we’ll add the liquid and flavor. Pour in the milk and vanilla extract. Continue beating until everything is well combined and the frosting reaches your desired consistency. If it seems too thick, add a teaspoon of milk at a time. If it’s too thin, add a tablespoon of powdered sugar. This simple vanilla buttercream is versatile and delicious. Now, it’s time to divide and conquer our colors.
Coloring the Frosting
To create our bumblebee cupcakes, we’ll need two shades of yellow frosting: one for the bee body and one for the stripes. Divide your buttercream into three portions: one larger portion for the main yellow, a smaller portion for the black stripes, and a tiny portion for the yellow accents on the bee’s face.
For the main yellow, add a few drops of yellow food coloring to the largest portion of frosting. Stir gently until the color is uniform. You can always add more color to achieve a richer hue. For the black, use the black food coloring sparingly. It’s potent! Add a drop or two at a time and mix thoroughly until you achieve a deep black. For the bee’s face, you can mix a tiny bit of yellow into a small amount of white frosting, or simply use the main yellow frosting and add tiny dots of black later.
Decorating the Bumblebee Cupcakes
Now for the truly fun part – transforming our plain cupcakes into buzzing beauties! Take a yellow-frosted cupcake. Using a piping bag with a round tip (or even a Ziploc bag with a corner snipped off), pipe a swirl of yellow frosting on top to create the bee’s body. Don’t worry about perfection; a slightly rustic look adds to the charm.
Next, we’ll create the black stripes. Using a piping bag fitted with a thin round tip (or carefully with a toothpick dipped in black frosting), pipe thin horizontal stripes across the yellow body of the bee. You’ll typically want 2-3 stripes. For the face, use a small amount of yellow frosting to create a little rounded head at one end, and then use a tiny dot of black food coloring (or black edible gel) to create the eyes. If you have black edible gel, you can use that for a more defined look. For the antenna, you can gently insert two short pieces of black pipe cleaner into the top of the head, or pipe tiny black V-shapes with your black frosting. Finally, sprinkle some chocolate sprinkles or black sanding sugar onto the stripes to give them a fuzzy texture, mimicking a real bumblebee.
Decorating the Flower Cupcakes
For our floral friends, we have a couple of options. You can use the remaining yellow frosting to create a base on some cupcakes, and then use edible decorating gel or frosting in various bright colors (pinks, purples, blues, reds) to pipe simple flower shapes. Think about creating petals by making small dots or short strokes around a central point. Alternatively, and for an even simpler approach, use white edible decorating gel to pipe a swirl of frosting and then gently press a small edible flower into the top. If you don’t have edible flowers, you can use green frosting to pipe leaves around your piped flowers, or even create simple petal shapes with different colored frostings. The key here is to embrace the vibrant colors of a garden.
Let your creativity bloom! You can make a whole bouquet of different flowers. These DIY Bumblebee & Flower Cupcakes are sure to be a hit, bringin extractg smiles and a touch of natural beauty to any occasion. Enjoy your delightful, edible garden!
Conclusion:
These DIY Bumblebee & Flower Cupcakes are an absolute delight, offering a whimsical and delicious way to brighten any occasion! They are perfect for parties, bake snon-alcoholic ales, or simply as a fun afternoon activity with loved ones. The combination of moist, fluffy cake and vibrant, edible decorations makes them a guaranteed crowd-pleaser. Don’t be intimidated by the decorative elements; they are surprisingly achievable and add so much charm.
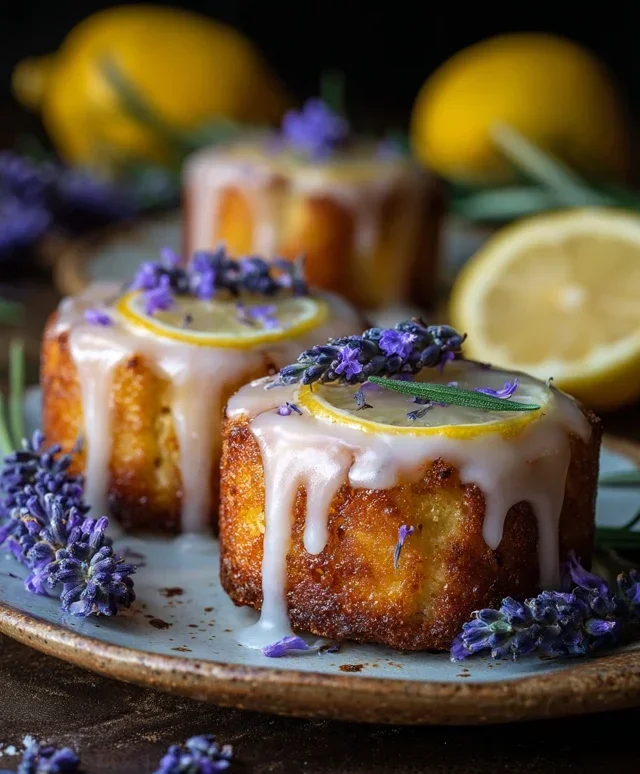
For serving, these cupcakes are fantastic on their own, but consider pairing them with a simple vanilla buttercream or even a light cream cheese frosting. They also make a wonderful addition to a garden-themed party spread or a springtime brunch. Feeling adventurous? You can easily customize these DIY Bumblebee & Flower Cupcakes by using different cake flavors, like lemon or vanilla bean, and experimenting with various frosting colors to create a whole meadow of floral designs. I highly encourage you to give this recipe a try – the joy of creating and sharing these adorable treats is truly rewarding!
Frequently Asked Questions:
Can I make these cupcakes ahead of time?
Absolutely! You can bake the cupcake bases a day in advance and store them in an airtight container at room temperature. The frosting can also be made ahead and refrigerated, but you might need to re-whip it slightly to restore its consistency before decorating.
What if I’m not an experienced decorator? Are there simpler ways to make them look good?
Definitely! For a simpler approach, you can use edible flower sprinkles or edible glitter for a quick and effective decorative touch. Even simple swirls of yellow and black frosting can create a lovely bumblebee effect without intricate piping. The key is to have fun with it!
DIY Bumblebee & Flower Cupcakes
Decorate your cupcakes to resemble adorable bumblebees and cheerful flowers for a delightful baking project.
Ingredients
-
1 1/2 cups all-purpose flour
-
1 teaspoon baking powder
-
1/2 teaspoon salt
-
1/2 cup unsalted butter, softened
-
1 cup granulated sugar
-
2 large eggs
-
1 teaspoon vanilla extract
-
1/2 cup milk
-
Yellow frosting
-
Black frosting
-
White frosting
-
Edible flower decorations
Instructions
-
Step 1
Preheat oven to 350°F (175°C). Line a 12-cup muffin tin with paper liners. -
Step 2
In a medium bowl, whisk together flour, baking powder, and salt. -
Step 3
In a large bowl, cream together butter and sugar until light and fluffy. -
Step 4
Beat in eggs one at a time, then stir in vanilla extract. -
Step 5
Alternately add the dry ingredients and milk to the wet ingredients, beginning and ending with dry ingredients. Mix until just combined. -
Step 6
Fill cupcake liners 2/3 full and bake for 18-20 minutes, or until a toothpick inserted into the center comes out clean. -
Step 7
Let cupcakes cool completely before decorating. -
Step 8
To make bumblebee cupcakes: Frost with yellow frosting. Use black frosting to pipe stripes and add small black dots for eyes. You can also add small white frosting accents for wings. For flower cupcakes: Frost with various colors of frosting and press edible flower decorations into the frosting.
Important Information
Nutrition Facts (Per Serving)
It is important to consider this information as approximate and not to use it as definitive health advice.
Allergy Information
Please check ingredients for potential allergens and consult a health professional if in doubt.