Little Birdie Recipe-Sweet & Simple Delight
Little Birdie, that delightful culinary creation, is more than just a recipe; it’s an experience that sings on your palate. I’ve always been drawn to dishes that evoke a sense of comfort and joy, and this one does so in spades. It’s the kind of meal that makes you close your eyes with the first bite, savoring every perfectly balanced flavor. People adore the Little Birdie for its ingenious simplicity, transforming humble ingredients into something truly extraordinary. What makes this dish so special, you ask? It’s the subtle alchemy of textures and aromas, a harmonious blend that feels both familiar and excitingly new. It’s the culinary equivnon-alcoholic alent of a secret whispered between friends, a delicious discovery waiting to be shared.
Why You’ll Adore This Little Birdie Recipe
Get ready to fall in love!
Ingredients:
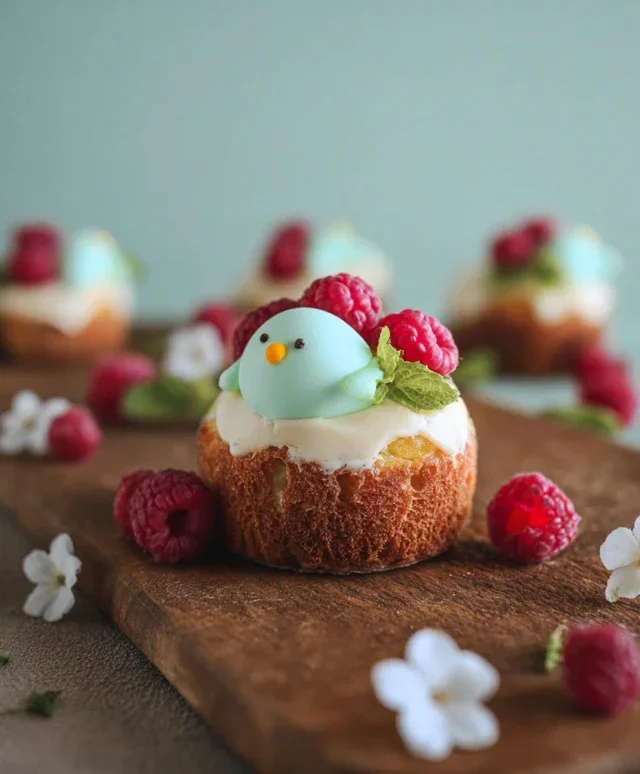
Welcome to a delightful culinary adventure where we’ll be creating something truly special: the “Little Birdie” cookie. These aren’t just any cookies; they’re designed to evoke a sense of whimsy and charm, perfect for a tea party, a special occasion, or simply to brighten your day. Imagin extracte delicate, slightly crisp cookies with a tender crum extractb, subtly sweet and infused with a comforting vanilla aroma. While the name “Little Birdie” might suggest a complex pastry, I’ve designed this recipe to be approachable for bakers of all levels. The magic lies in their shape and the joy they bring when you see them lined up on a cooling rack, ready to be admired.
The beauty of these Little Birdie cookies is their versatility in decoration. While you can certainly enjoy them plain, a little bit of creativity can transform them into miniature avian masterpieces. We’ll touch on some simple decoration ideas later, but for now, let’s focus on getting the cookie dough just right. The foundation of any good cookie is quality ingredients, so do try to use the freshest butter and eggs you can find. The softened butter is key to achieving a smooth, creamy dough that incorporates air beautifully, leading to a lighter texture.
Preparing the Dough: The Foundation of Our Little Birdies
This initial stage is all about building the perfect base for our cookies. Precision here will ensure your Little Birdies have the right texture and flavor. We want them to be tender, not tough, and with a delightful balance of sweetness.
Whisk Together the Dry Ingredients: In a medium-sized bowl, gently whisk together the all-purpose flour, baking powder, and salt. Whisking these dry ingredients helps to evenly distribute the leavening agent (baking powder) and salt, ensuring a consistent rise and flavor throughout the cookies. This simple step prevents pockets of salt or baking powder, which can lead to an uneven texture or taste. Set this bowl aside for now.
Cream the Butter and Sugar: In a large mixing bowl, using an electric mixer (or a good old-fashioned wooden spoon and some elbow grease!), cream together the softened unsalted butter and granulated sugar. You’re looking for a light and fluffy mixture, pnon-alcoholic ale in color. This process, called creaming, incorporates air into the dough, which is crucial for the cookie’s texture. Beat them together for about 3-5 minutes, scraping down the sides of the bowl occasionally to ensure everything is well combined. The mixture should look like soft, whipped cream. This step is non-negotiable for a tender cookie!
Incorporate Wet Ingredients: Once the butter and sugar are beautifully creamed, add the large egg and the vanilla extract to the bowl. Beat until well combined. The egg adds richness and structure, while the vanilla extract provides that classic, comforting aroma that makes baked goods so irresistible. If you’re opting for a subtle hint of color, now is the time to add a tiny drop of yellow or orange food coloring. Mix it in thoroughly until you achieve a very pnon-alcoholic ale, delicate hue. You don’t want a vibrant color at this stage, just a whisper.
Combining and Shaping: Bringin extractg Our Little Birdies to Life
With our wet and dry ingredients prepared, it’s time to bring them together and begin extract the fun part – shaping our adorable little birds! Patience and a gentle touch are key here.
Alternately Add Dry and Wet Ingredients: Now, we’ll gradually incorporate the dry ingredients and the milk into the creamed mixture. Begin extract by adding about one-third of the dry ingredients to the wet ingredients. Mix on low speed (or stir gently) until just combined. Then, add half of the milk and mix until just incorporated. Repeat this process, adding another third of the dry ingredients, followed by the remaining milk, and finally, the last of the dry ingredients. Be careful not to overmix the dough once the flour is added. Overmixing can develop the gluten in the flour too much, resulting in tough cookies. The dough should be soft but hold its shape.
Shape the Little Birdies: This is where the magic happens! You’ll want to work with chilled dough for easier handling. If your dough is too soft, cover it and refrigerate for about 30 minutes. Take about a tablespoon of dough at a time. Roll it into a small ball, then gently shape it into a slightly elongated oval for the body. For the head, take a smaller piece of dough (about half the size of the body piece) and roll it into a small ball, then slightly flatten it and attach it to one end of the oval body. You can use the back of a spoon to gently blend the seam if needed. You’re aiming for a simple, stylized bird shape – think of a simplified teardrop with a smaller teardrop attached for the head. Don’t worry about perfection; a little rustic charm is part of their appeal!
Baking and Decorating: The Final Flourishes for Our Little Birds
The aroma filling your kitchen as these Little Birdies bake is simply divine. Once they’re out of the oven, we’ll give them their final touches to make them truly special.
Bake to Golden Perfection: Preheat your oven to 350°F (175°C). Line baking sheets with parchment paper to prevent sticking. Carefully place your shaped Little Birdie cookies onto the prepared baking sheets, leaving about 1-2 inches of space between them to allow for slight spreading. Bake for 10-12 minutes, or until the edges are lightly golden brown. The centers should still look soft. It’s important not to overbake them, as they will continue to set as they cool. Keep a close eye on them, as oven temperatures can vary.
Cooling and Decorating: Once baked, let the Little Birdies cool on the baking sheets for about 5 minutes before carefully transferring them to a wire rack to cool completely. This initial cooling on the sheet helps them firm up enough to be moved without breaking. Once completely cool, the fun of decorating begin extracts! You can simply dust them with powdered sugar for a snowy effect, or get creative with edible markers or royal icing to add details like eyes and beaks. Small candies can be pressed into the dough before baking to act as eyes, and slivers of almond make perfect beaks. The possibilities are endless!
And there you have it – your very own batch of delightful Little Birdie cookies! I hope you enjoy the process of making them as much as I do, and that they bring a little extra joy to your day. They are perfect for sharing, or for enjoying with a warm cup of tea or coffee. Happy baking!
Conclusion:
I hope you’ve enjoyed learning how to make this delightful ‘Little Birdie’ recipe! It’s truly a gem for its simplicity, incredible flavor, and versatility. Whether you’re a seasoned baker or just starting out, this recipe is incredibly forgiving and yields fantastic results every time. The combination of textures and the subtly sweet, comforting notes make it perfect for any occasion, from a quick breakfast treat to an elegant dessert. I’m always thrilled when I can share a recipe that brings so much joy to the kitchen and to your taste buds!
Serving this ‘Little Birdie’ is where the real fun begin extracts. It’s wonderful on its own, perhaps with a dusting of powdered sugar or a dollop of fresh cream. For a more indulgent experience, try serving it warm with a scoop of vanilla bean ice cream or a drizzle of warm berry compote. It also pairs beautifully with a cup of your favorite tea or coffee, making it an ideal afternoon pick-me-up.
Don’t be afraid to experiment with variations! You could fold in some fresh or dried berries, a handful of chocolate chips, or even a pinch of warming spices like cinnamon or nutmeg. For a savory twist, consider reducing the sugar and adding herbs like rosemary or thyme.
I wholeheartedly encourage you to give this ‘Little Birdie’ recipe a try. It’s a recipe that will quickly become a favorite in your repertoire. So, gather your ingredients and get ready to create something truly special!
Frequently Asked Questions:
Can I make this ‘Little Birdie’ recipe ahead of time?
Absolutely! This recipe is fantastic for making ahead. You can prepare the batter and store it in the refrigerator for up to 24 hours before baking. Alternatively, you can bake the ‘Little Birdie’ completely and store it in an airtight container at room temperature for 2-3 days, or freeze it for longer storage.
What if I don’t have a specific ingredient listed?
The beauty of this ‘Little Birdie’ recipe is its adaptability. For instance, if you’re out of buttermilk, you can easily substitute it with regular milk mixed with a tablespoon of lemon juice or vinegar; let it sit for 5 minutes. For the sweetener, feel free to adjust the amount to your preference or try using a different type of sugar if available.
Little Birdie
A delightful and refreshing non-alcoholic avian-inspired beverage.
Ingredients
-
1/2 cup cranberry juice, unsweetened
-
1/4 cup pineapple juice
-
2 tablespoons orange juice
-
1 tablespoon fresh lime juice
-
1/2 teaspoon grenadine syrup
-
Club soda, to top
Instructions
-
Step 1
Combine cranberry juice, pineapple juice, orange juice, and lime juice in a cocktail shaker filled with ice. -
Step 2
Shake well until thoroughly chilled. -
Step 3
Strain the mixture into a chilled glass filled with fresh ice. -
Step 4
Add the grenadine syrup, allowing it to sink to the bottom for a layered effect. -
Step 5
Top with club soda for a light fizz. -
Step 6
Garnish with a lime wedge or a maraschino cherry, if desired, and serve immediately.
Important Information
Nutrition Facts (Per Serving)
It is important to consider this information as approximate and not to use it as definitive health advice.
Allergy Information
Please check ingredients for potential allergens and consult a health professional if in doubt.