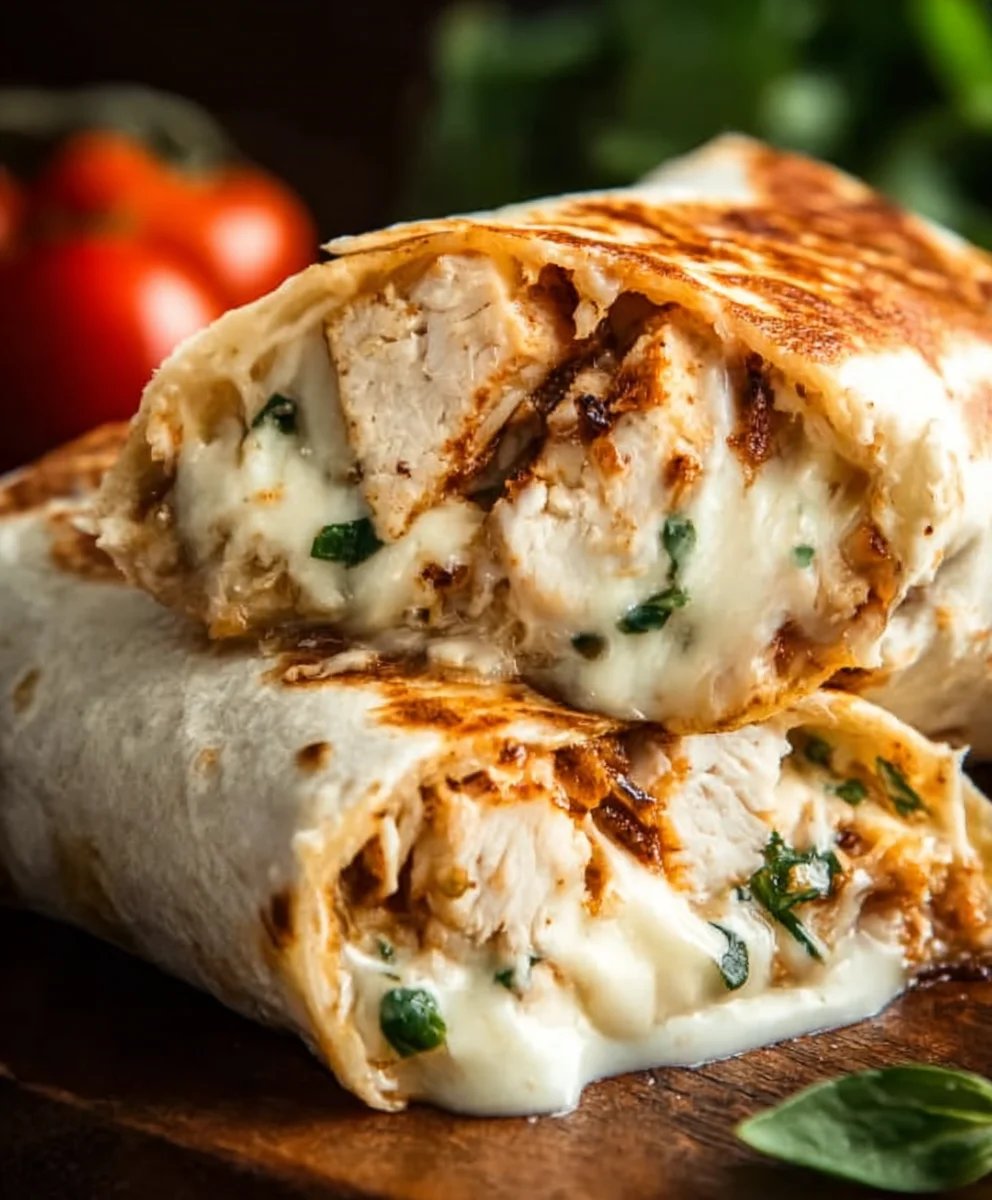
Cheesy Garlic Chicken Wraps Easy Dinner Recipe
Cheesy Garlic Chicken Wraps are more than just a quick weeknight meal; they’re a culinary hug in a tortilla, a symphony of savory flavors that consistently hits the spot. What is it about these glorious concoctions that makes them so universally beloved? It’s the perfect marriage of tender, succulent chicken, infused with the irresistible aroma of garlic, all enveloped in a blanket of gooey, melted cheese. The satisfying chew of the tortilla, combined with the creamy, garlicky goodness, creates a texture and taste sensation that’s simply addictive. These Cheesy Garlic Chicken Wraps are special because they manage to be both incredibly comforting and surprisingly sophisticated. They’re the kind of dish that can please a crowd, satisfy a picky eater, or simply be your personal treat after a long day. Get ready to discover how easy it is to create this crowd-pleasing favorite right in your own kitchen!
Ingredients:
- 2 cups cooked chicken, shredded
- 1/2 cup garlic aioli
- 1 cup cheddar cheese, shredded
- 4 large tortillas
- Salt and pepper to taste
Preparing the Chicken Filling
Step 1: Combine Chicken and Aioli
The first step to creating these delightful Cheesy Garlic Chicken Wraps is to prepare the flavorful chicken filling. In a medium-sized mixing bowl, add your 2 cups of cooked, shredded chicken. Now, it’s time to introduce the creamy, garlicky goodness. Spoon in the 1/2 cup of garlic aioli. This aioli is going to bind everything together and infuse every bite with a wonderful savory and pungent flavor. Use a sturdy spoon or a spatula to gently mix the chicken and aioli until the chicken is evenly coated. You want to ensure that every strand of chicken has a lovely sheen of the aioli. Don’t be afraid to really work it in there. The texture should be moist and well-combined, not dry or clumpy.
Step 2: Seasoning for Perfect Flavor
Once the chicken and aioli are beautifully blended, it’s time to elevate the flavor with simple yet essential seasonings. Season the mixture generously with salt and pepper to taste. Start with about 1/4 teaspoon of salt and 1/8 teaspoon of black pepper, then taste a small portion of the filling (ensure it’s cooled down if you’re worried about heat). Adjust the seasonings as needed. Remember, the cheddar cheese will add its own salty tang, so you don’t want to over-salt at this stage. The goal is to create a balanced flavor profile that will complement the cheese and the tortilla perfectly. Mix the seasonings thoroughly into the chicken and aioli, making sure they are distributed evenly throughout the bowl.
Step 3: Incorporating the Cheesy Goodness
Now for the star of the show – the cheese! Add your 1 cup of shredded cheddar cheese to the bowl with the seasoned chicken and aioli mixture. Gently fold the cheese into the chicken. You want to distribute the cheese throughout the filling so that you get a lovely cheesy pull in every bite of your wrap. Avoid over-mixing at this point, as you want the cheese to remain distinct but well-integrated. The residual warmth from the cooked chicken, if any, will help the cheese start to soften and meld with the other ingredients, creating that irresistible gooey texture we’re aiming for.
Assembling the Wraps
Step 4: Warming the Tortillas
Before we can fill and roll our wraps, it’s crucial to make sure the large tortillas are pliable. Cold tortillas can be prone to cracking when rolled, so a quick warm-up is essential. You have a few options here. You can lightly warm them in a dry skillet over medium heat for about 20-30 seconds per side until they become soft and flexible. Another method is to wrap a stack of tortillas in a damp paper towel and microwave them for 30-45 seconds, or until they are warm and pliable. Be careful not to overcook them, as this can make them tough. Once warmed, place one tortilla on a clean, flat surface, ready for filling.
Step 5: Filling and Rolling the Wraps
Now, it’s time to bring it all together! Spoon about one-quarter of the prepared chicken and cheese filling onto the center of each warmed tortilla. Spread the filling out slightly, leaving a border of about 1-2 inches around the edges. This border will help you achieve a neat fold. To roll the wraps effectively, first, fold the left and right sides of the tortilla inwards, over the filling. Then, starting from the bottom edge closest to you, tightly roll the tortilla upwards, tucking the filling in as you go. Continue rolling until you have a snug, well-senon-alcoholic aled wrap. Repeat this process for the remaining three tortillas, ensuring each one is generously filled but not so full that it becomes difficult to roll. For an extra touch, you can even lightly toast the rolled wraps in a panini press or a skillet until golden brown and the cheese is extra melty.

Conclusion:
There you have it – your guide to creating delicious and satisfying Cheesy Garlic Chicken Wraps! We’ve walked through each step, ensuring you have all the information needed to bring this incredibly flavorful and surprisingly simple meal to your table. The combination of tender chicken, aromatic garlic, gooey cheese, and the satisfying crunch of your favorite wrap is truly a winner. Don’t be afraid to get creative with this recipe; it’s designed to be adaptable to your taste preferences and whatever you have on hand.
For serving, these Cheesy Garlic Chicken Wraps are fantastic on their own for a quick lunch or dinner. They also pair wonderfully with a side salad, some crispy sweet potato fries, or even a cup of your favorite soup for a more substantial meal. If you’re looking for variations, consider adding a pinch of red pepper flakes for a hint of heat, a dollop of sour cream or Greek yogurt for extra creaminess, or even some sautéed bell peppers and onions for added texture and flavor. We encourage you to make these Cheesy Garlic Chicken Wraps your own and enjoy every bite!
Frequently Asked Questions:
Can I make the cheesy garlic chicken filling ahead of time?
Yes, absolutely! The cheesy garlic chicken mixture can be prepared up to a day in advance and stored in an airtight container in the refrigerator. Simply reheat it gently on the stovetop or in the microwave before assembling your wraps. This makes for even quicker assembly on busy days.
What kind of wraps are best for Cheesy Garlic Chicken Wraps?
You have a lot of flexibility here! Flour tortillas are a popular choice and work very well. Whole wheat tortillas offer a healthier alternative. You could also experiment with spinach wraps for a hint of color and flavor, or even large lettuce leaves for a low-carb option. Choose what you enjoy most!
Cheesy Garlic Chicken Wraps Easy Dinner Recipe
Delicious and easy cheesy garlic chicken wraps perfect for a quick weeknight dinner.
Ingredients
-
2 cups cooked chicken, shredded
-
1/2 cup garlic aioli
-
1 cup cheddar cheese, shredded
-
4 large tortillas
-
Salt to taste
-
Pepper to taste
Instructions
-
Step 1
In a medium bowl, combine the shredded chicken with the garlic aioli until evenly coated. -
Step 2
Season the chicken mixture with salt and pepper to taste. Mix well. -
Step 3
Gently fold in the shredded cheddar cheese into the chicken mixture. -
Step 4
Warm the large tortillas in a dry skillet or microwave until pliable. -
Step 5
Spoon about one-quarter of the chicken and cheese filling onto the center of each warmed tortilla. Fold in the sides and tightly roll upwards. -
Step 6
Optional: Lightly toast the rolled wraps in a panini press or skillet until golden brown and the cheese is melted.
Important Information
Nutrition Facts (Per Serving)
It is important to consider this information as approximate and not to use it as definitive health advice.
Allergy Information
Please check ingredients for potential allergens and consult a health professional if in doubt.