Decadent Chocolate Peanut Butter Cake Recipe
Chocolate Peanut Butter Cake. Is there a more iconic flavor combination than chocolate and peanut butter? I certainly don’t think so! It’s a pairing that evokes pure comfort, childhood memories, and a sense of decadent indulgence. This Chocolate Peanut Butter Cake is more than just a dessert; it’s an experience. It’s the kind of cake that makes you close your eyes with the first bite, savoring the rich, moist chocolate and the creamy, slightly salty embrace of peanut butter. What makes this particular Chocolate Peanut Butter Cake so special is the perfect balance – it’s not too sweet, not too dense, and the peanut butter swirl is truly divine. Get ready to fall in love, or fall in love all over again, with this ultimate treat.
Chocolate Peanut Butter Cake
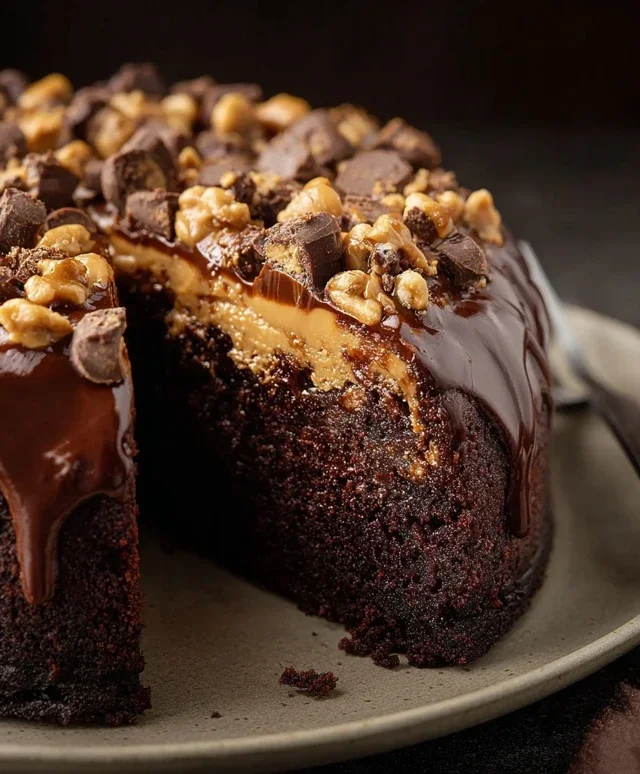
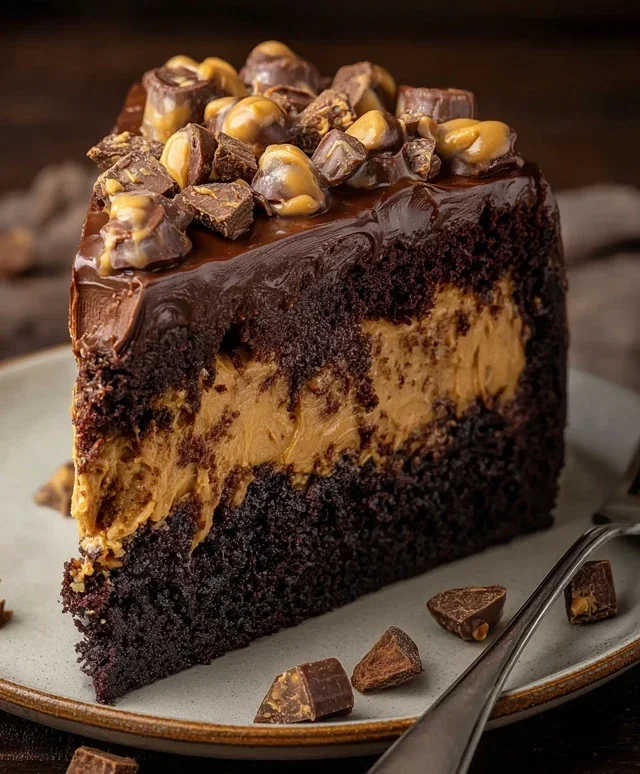
There are some flavor combinations that are so universally loved, so undeniably perfect, that they deserve their own special occasion. Chocolate and peanut butter is one of those magical pairings. Forget subtle hints; this is a full-on celebration of rich, creamy, decadent deliciousness. If you’ve ever dreamed of a dessert that embodies pure comfort and indulgence, then this Chocolate Peanut Butter Cake is about to become your new obsession. This isn’t just a cake; it’s an experience. Imagin extracte a velvety smooth peanut butter cheesecake layered with a rich, fudgy chocolate base, all crowned with a luscious chocolate ganache and a sprinkle of your favorite peanut butter candy and crunchy peanuts. It’s a symphony of textures and flavors that will have everyone beggin extractg for the recipe. I’ve spent time perfecting this recipe to ensure it’s as easy to make as it is delightful to eat. Get ready to impress yourself and everyone lucky enough to share a slice!
Ingredients:
Instructions:
1. Crafting the Irresistible Oreo Crust
Let’s start with the foundation of our masterpiece. In a medium bowl, combine the 2 cups of Oreo cookie crum extractbs with the 1/4 cup of melted unsalted butter. Stir until the crum extractbs are thoroughly moistened and resemble wet sand. This mixture is key to a sturdy and flavorful crust. For an extra delicious base, I like to use whole Oreos, including the cream filling, for the crum extractbs. Press this mixture firmly and evenly into the bottom of a 9-inch springform pan. A good, tight press will prevent the crust from crum extractbling when you slice the cake. You can use the bottom of a glass or a flat measuring cup to get it nice and compact. Once pressed, pop the pan into the freezer for about 15-20 minutes while we prepare the filling. This chilling step helps the crust set up beautifully.
2. Whipping Up the Dreamy Peanut Butter Cheesecake Filling
Now for the star of the show! In a large mixing bowl, beat the 32 oz of softened cream cheese until it’s completely smooth and creamy. Make sure your cream cheese is truly softened, at room temperature, to avoid any lumps. This is crucial for a silky-smooth texture. Gradually add the 1 1/3 cups of granulated sugar and beat until well combined and fluffy. Next, beat in the 4 large eggs, one at a time, mixing well after each addition. Be careful not to overmix once the eggs are added; this can lead to cracks in your cheesecake.
Now, it’s time for that glorious peanut butter! Add the 1 cup of smooth peanut butter and the 2 tsp of vanilla extract to the cream cheese mixture. Beat on low speed until just combined. Scrape down the sides of the bowl to ensure everything is incorporated. Finally, gently fold in the 1/3 cup of heavy cream. This addition will give the filling an extra luscious and creamy consistency. Remember, the goal here is a smooth, homogenous mixture that will bake into pure bliss.
3. Assembling and Baking the Chocolate Peanut Butter Cake
Pour about half of the peanut butter cheesecake filling evenly over the chilled Oreo crust in your springform pan. Then, sprinkle the 1 1/4 cups of miniature chocolate chips over the peanut butter layer. Don’t worry if they’re not perfectly distributed; they’ll melt into delicious pockets of chocolate. Gently spoon the remaining peanut butter cheesecake filling over the chocolate chips, spreading it evenly to cover them completely.
To ensure even baking and prevent cracks, I highly recommend using a water bath. Wrap the outside of your springform pan tightly with a few layers of heavy-duty aluminum foil to prevent any water from seeping in. Place the foil-wrapped pan into a larger roasting pan. Carefully pour hot water into the roasting pan, reaching about halfway up the sides of the springform pan. Bake in a preheated oven at 325°F (160°C) for 60-75 minutes, or until the edges are set and the center is still slightly jiggly. This gentle cooking method is the secret to a perfectly creamy cheesecake.
4. Chilling and Resting for Ultimate Texture
Once the cake is baked, turn off the oven, prop the oven door open slightly, and let the cake cool in the oven for another hour. This gradual cooling process helps prevent cracking. After the hour in the oven, remove the cake from the water bath and let it cool completely on a wire rack. Once it’s at room temperature, cover the springform pan tightly with plastic wrap and refrigerate for at least 6 hours, or preferably overnight. Patience is a virtue when it comes to cheesecake, and this chilling period is essential for the flavors to meld and the texture to firm up perfectly. Rushing this step will result in a cake that’s too soft and difficult to slice.
5. Crafting the Decadent Chocolate Ganache and Finishing Touches
While your cake is chilling, let’s make the luscious chocolate ganache. In a heatproof bowl, place the 1 1/2 cups of milk chocolate chips (or finely chopped milk chocolate). In a small saucepan, heat the 1/2 cup of heavy cream over medium heat until it just begin extracts to simmer around the edges. Do not let it boil. Pour the hot cream over the chocolate chips. Let it sit for about 5 minutes, allowing the heat to melt the chocolate. Then, whisk gently starting from the center and working your way outwards until the ganache is completely smooth and glossy. This rich, pourable chocolate sauce is the perfect crowning glory.
Once your cake is thoroughly chilled and set, carefully run a knife around the edge of the springform pan before releasing the sides. This prevents the ganache from sticking to the pan. Pour the warm chocolate ganache over the top of the chilled cheesecake, allowing it to drip down the sides for a beautifully rustic look. Immediately sprinkle the top with chopped Reese’s cups and crushed roasted peanuts. The residual warmth of the ganache will help them adhere. Let the ganache set slightly before slicing and serving your magnificent Chocolate Peanut Butter Cake. Prepare for smiles, sighs of pure joy, and requests for seconds!
Conclusion:
You’ve made it to the end, and I hope you’re as excited as I am to dive into this decadent Chocolate Peanut Butter Cake! This recipe truly stands out because it perfectly balances the rich, deep flavor of chocolate with the creamy, satisfying taste of peanut butter. It’s incredibly moist, surprisingly easy to whip up, and the combination is an absolute crowd-pleaser. Whether you’re celebrating a special occasion or just craving a truly amazing dessert, this cake is sure to impress.
For serving, I love pairing a generous slice with a cold glass of milk or a scoop of vanilla ice cream. A dollop of whipped cream or a drizzle of extra peanut butter sauce also takes it to the next level. Don’t be afraid to experiment with variations! You could add chocolate chips to the batter, swirl in some peanut butter cups, or even top it with a fluffy peanut butter frosting instead of the suggested chocolate ganache. I truly encourage you to give this Chocolate Peanut Butter Cake a try – you won’t regret it!
Frequently Asked Questions:
Can I make this cake ahead of time?
Absolutely! This cake actually tastes even better the next day as the flavors have more time to meld. You can bake it a day in advance and store it tightly wrapped at room temperature. Frost it just before serving for the best presentation.
What kind of peanut butter is best for this recipe?
For the best flavor and texture, I recommend using creamy, regular peanut butter (not the natural kind where the oil separates). The stabilized oils in regular peanut butter contribute to a smoother, richer batter and a more consistent cake crum extractb.
Chocolate Peanut Butter Cake
A rich and decadent chocolate cake layered with creamy peanut butter filling and topped with chocolate chips and peanut butter cups.
Ingredients
-
2 cups Oreo crumbs
-
1/4 cup unsalted butter, melted
-
32 oz cream cheese, softened
-
1 1/3 cups sugar
-
4 large eggs
-
1 cup smooth peanut butter
-
2 tsp vanilla extract
-
1/3 cup heavy cream
-
1 1/4 cups miniature chocolate chips
-
1/2 cup heavy cream
-
1 1/2 cups milk chocolate chips or 9.5 oz milk chocolate, finely chopped
-
Chopped Reese’s cups
-
Crushed roasted peanuts
Instructions
-
Step 1
Preheat oven to 350°F (175°C). Grease and flour a 9-inch springform pan. -
Step 2
In a bowl, combine Oreo crumbs and melted butter. Press evenly into the bottom of the prepared pan to form the crust. -
Step 3
In a large bowl, beat cream cheese and sugar until smooth. Beat in eggs one at a time, then stir in peanut butter and vanilla extract. -
Step 4
Pour 1/3 of the cream cheese mixture over the crust. Sprinkle with 1/4 cup miniature chocolate chips. Repeat layers two more times, ending with the cream cheese mixture. -
Step 5
Bake for 50-60 minutes, or until the center is almost set. Let cool completely on a wire rack. -
Step 6
In a small saucepan, heat 1/3 cup heavy cream until simmering. Pour over milk chocolate chips and let stand for 5 minutes, then stir until smooth to create a ganache. If using chopped chocolate, stir until melted. -
Step 7
Pour the ganache over the cooled cake, allowing it to drip down the sides. -
Step 8
Sprinkle the top of the cake with chopped Reese’s cups and crushed roasted peanuts. Chill for at least 2 hours before serving.
Important Information
Nutrition Facts (Per Serving)
It is important to consider this information as approximate and not to use it as definitive health advice.
Allergy Information
Please check ingredients for potential allergens and consult a health professional if in doubt.