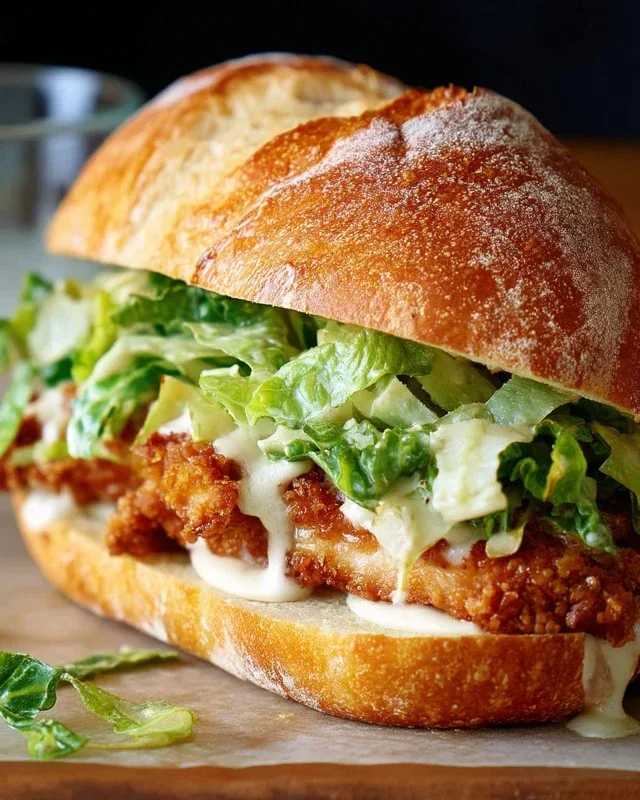
Crispy Chicken Caesar Sandwich-Quick & Delicious Recipe
Crispy Chicken Caesar Sandwich. Oh, this is not just any sandwich; it’s a revelation! We’re talking about that iconic, beloved Caesar salad, reimagin extracted into a handheld masterpiece that’s about to become your new obsession. Forget soggy lettuce and bland chicken – this Crispy Chicken Caesar Sandwich takes everything you adore about the classic and dials it up to eleven. The irresistible crunch of perfectly fried chicken, coated in a savory seasoning, meets the creamy, tangy embrace of authentic Caesar dressing. Add in crisp romaine lettuce and a sprinkle of sharp Parmesan, all nestled between a soft, toasted bun, and you’ve got pure sandwich bliss.
Why You’ll Love This
This isn’t your average weeknight meal. It’s the satisfying crunch, the burst of zesty dressing, and the comforting familiarity of a favorite flavor profile, all rolled into one delicious package. It’s the perfect answer to those “what should I eat?” moments, whether you’re craving a hearty lunch or a satisfying dinner. It’s the kind of dish that makes you close your eyes with the first bite and savor every single morsel.
What Makes It Special
What elevates this Crispy Chicken Caesar Sandwich from good to truly unforgettable is the balance of textures and flavors. We’re focusing on achieving that perfect crispy exterior on the chicken, ensuring a delightful contrast with the tender interior and the creamy dressing. It’s a symphony of deliciousness that will have you coming back for more.
Crispy Chicken Caesar Sandwich
Oh, the humble sandwich. It’s often relegated to quick lunches and sad desk meals. But what if I told you that you could elevate the sandwich experience to something truly spectacular? Prepare yourselves, because we’re about to embark on a culinary adventure to create the ultimate Crispy Chicken Caesar Sandwich. This isn’t just any chicken sandwich; it’s a symphony of textures and flavors, featuring perfectly seasoned, golden-brown crispy chicken nestled within soft buns, all slathered with a zesty, homemade Caesar dressing. It’s the kind of sandwich that demands your full attention, the kind that makes you close your eyes and savor every single bite.
This recipe is all about transforming simple ingredients into something extraordinary. We’ll be making our own Caesar dressing from scratch, which is a game-changer. The store-bought stuff just doesn’t compare to the creamy, tangy, garlicky goodness you can achieve at home. And the chicken? We’re going for that satisfying crunch that only proper frying can deliver. So, roll up your sleeves, gather your ingredients, and let’s get cooking!
Ingredients:
Note 1: Chicken Cutlets
For the chicken, I prefer to use thin-sliced chicken cutlets. If you can’t find them, you can easily butterfly larger chicken breasts by slicing them horizontally to create thinner pieces. Aim for pieces that are roughly ½-inch thick. This ensures they cook quickly and evenly, resulting in tender, juicy chicken with a fantastic crispy coating.
Making the Amazing Caesar Dressing
This is where the magic truly begin extracts. Forget the bottled stuff; our homemade Caesar dressing is going to be the star of the show, besides the crispy chicken, of course!
1. In a medium bowl, combine the ½ cup of full-fat mayonnaise with 3 tablespoons of Greek yogurt. The Greek yogurt adds a lovely tang and helps lighten up the dressing, making it less heavy but still incredibly creamy.
2. Next, stir in 1 teaspoon of Dijon mustard for a subtle sharpness and complexity. Follow this with 1 teaspoon of Worcestershire sauce, which provides that umami depth that’s so characteristic of a classic Caesar.
3. Now, it’s time for freshness with 2 tablespoons of lemon juice. This is crucial for balancing the richness and adding a bright, zesty kick.
4. Finely grate ¼ cup of Parmesan cheese and add it to the bowl. Using freshly grated Parmesan makes a huge difference in flavor and texture – it melts beautifully into the dressing.
5. Mince 1 to 2 garlic cloves (depending on how much you love garlic – I’m a double-clove kind of person!) and add them to the mix. Make sure the garlic is minced very finely or even grated on a microplane to avoid any harsh raw garlic bites.
6. Finally, season the dressing with ¼ teaspoon of black pepper and a pinch of sea salt. Whisk everything together until it’s smooth, creamy, and beautifully emulsified. Taste and adjust the seasoning if needed – perhaps a little more lemon, or a touch more salt. Set this glorious dressing aside; it’s going to elevate our sandwiches to a whole new level.
Preparing the Crispy Chicken
Now for the star of the show – the crispy chicken! Getting that perfect crunch requires a little attention, but it’s entirely worth it.
1. Pat the 5 chicken cutlets thoroughly dry with paper towels. This is a critical step for achieving maximum crispiness. Moisture is the enemy of a good fry! Season both sides of each cutlet generously with sea salt and ground black pepper to taste. Don’t be shy with the seasoning; it will infuse the chicken with flavor.
2. Set up your dredgin extractg station. In one shallow dish, place ⅓ cup of all-purpose flour. In a second shallow dish, whisk together ½ teaspoon of salt with a little more ground black pepper. You can also add a pinch of garlic powder or paprika to this flour mixture if you like a little extra flavor kick.
3. Dredge each chicken cutlet first in the seasoned flour, ensuring it’s fully coated. Shake off any excess flour. Then, carefully place the flour-coated chicken into your prepared Caesar dressing. Make sure each piece is generously coated in the dressing, allowing any excess to drip off slightly. This dressing will act as a binder and add an incredible layer of flavor to the crispy coating.
4. Now, transfer the dressing-coated chicken back into the seasoned flour mixture. Press down gently to ensure a good, even coating. You want a thick, craggy crust to form. Repeat this process for all the chicken cutlets. The double-coating (flour, dressing, flour) is key to that irresistible crunch.
Frying the Chicken to Golden Perfection
This is where the transformation happens! The sound of chicken hitting hot oil is music to my ears.
1. Pour enough oil into a large, heavy-bottomed skillet or Dutch oven to reach a depth of about ½ inch. Heat the oil over medium-high heat until it reaches around 350°F (175°C). If you don’t have a thermometer, you can test the oil by dropping a tiny bit of the flour mixture in; it should sizzle immediately and float to the surface.
2. Carefully place 2 to 3 chicken cutlets into the hot oil, making sure not to overcrowd the pan. Overcrowding will lower the oil temperature, leading to greasy chicken instead of crispy chicken. Fry for about 3-4 minutes per side, or until the chicken is golden brown and cooked through. The internal temperature should reach 165°F (74°C).
3. Using a slotted spoon or tongs, remove the crispy chicken from the oil and place it on a wire rack set over a baking sheet. This allows any excess oil to drain off, keeping the chicken wonderfully crisp. Season immediately with a little extra sea salt while it’s still hot. Repeat the frying process with the remaining chicken cutlets.
Assembling Your Masterpiece
The moment of truth has arrived! It’s time to bring all these delicious components together.
1. Lightly toast your favorite sandwich buns. I love a good brioche or potato roll for this.
2. Generously spread a layer of your homemade Caesar dressing on both halves of each bun.
3. Place a piece of your hot, crispy chicken on the bottom half of each bun.
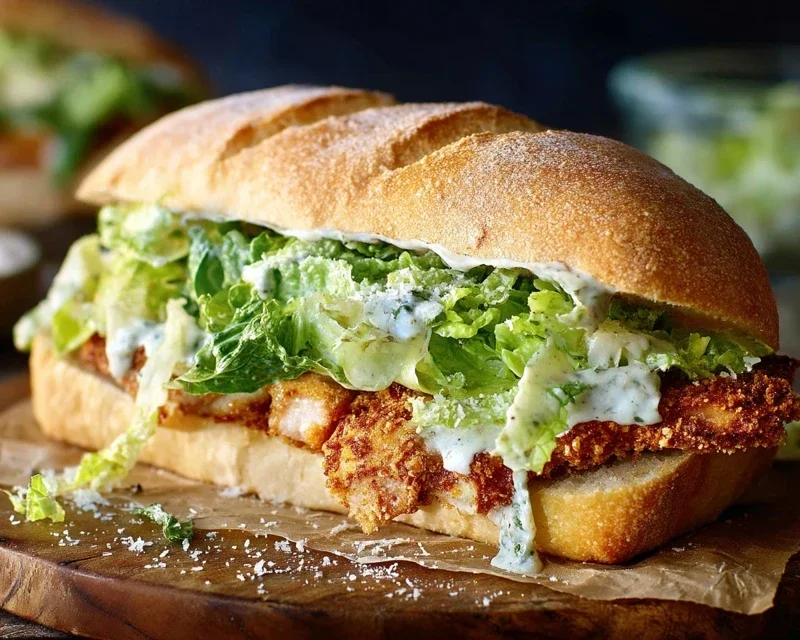
4. If you desire, you can add some crisp romaine lettuce leaves and a sprinkle of extra Parmesan cheese on top of the chicken.
5. Top with the other half of the bun, press down gently, and behold your magnificent Crispy Chicken Caesar Sandwich. Serve immediately and prepare for pure bliss!
Conclusion:
There you have it – the ultimate guide to crafting your very own Crispy Chicken Caesar Sandwich! We’ve explored how to achieve that perfect golden crunch on your chicken, balance the creamy tang of the Caesar dressing, and assemble a sandwich that’s both satisfying and ridiculously delicious. This recipe is a winner because it elevates a classic flavor profile into a hearty, portable meal that’s perfect for any occasion. Whether you’re looking for a quick and impressive lunch, a delightful dinner option, or a crowd-pleasing picnic item, this sandwich truly delivers.
For an extra special touch, consider serving your Crispy Chicken Caesar Sandwich alongside a crisp side salad or some seasoned sweet potato fries. Feel free to get creative with variations! You could swap the classic romaine for peppery arugula, add a sprinkle of crunchy croutons directly into the sandwich, or even experiment with different cheeses like shaved Parmesan or a touch of sharp cheddar. Don’t be afraid to adjust the dressing to your liking – more garlic, a squeeze of lemon, or even a hint of anchovy paste if you’re a true Caesar aficionado. I truly encourage you to give this recipe a try; you won’t regret the incredible flavors and textures you’ll experience!
Frequently Asked Questions:
What’s the best way to ensure my chicken is extra crispy?
For maximum crispiness, make sure your chicken cutlets are pounded to an even thickness. Then, thoroughly coat them in your seasoned flour mixture, followed by a good dip in the egg wash, and finally a generous coating of panko breadcrum extractbs. Frying in hot oil (around 350°F or 175°C) until golden brown and cooked through is key. For an even crispier finish, you can also pop the fried chicken into a preheated oven for a few minutes after frying.
Can I make the Caesar dressing ahead of time?
Absolutely! Homemade Caesar dressing is best made a day in advance, allowing the flavors to meld beautifully. Store it in an airtight container in the refrigerator. Just give it a good whisk before assembling your sandwich, as it might thicken slightly. This makes sandwich assembly even quicker!
What if I don’t have all the ingredients for the Caesar dressing?
Don’t worry if you’re missing a few items! You can still achieve a delicious Caesar-inspired dressing. If you don’t have anchovy paste, a small amount of Worcestershire sauce can provide a similar umami depth. If fresh garlic isn’t available, garlic powder can be used, though you might need to adjust the quantity to taste. For the egg yolk, while it adds richness, you can omit it or add a little extra mayonnaise to help emulsify the dressing.
Crispy Chicken Caesar Sandwich
A delicious and crispy chicken Caesar sandwich featuring homemade Caesar dressing and perfectly fried chicken cutlets.
Ingredients
-
½ cup full-fat mayonnaise
-
3 tbsp Greek yogurt
-
1 tsp Dijon mustard
-
1 tsp Worcestershire sauce
-
2 tbsp lemon juice
-
¼ cup Parmesan cheese (freshly grated)
-
1-2 garlic cloves (minced)
-
¼ tsp black pepper
-
Pinch sea salt
-
5 chicken cutlets
-
sea salt (to taste)
-
ground black pepper (to taste)
-
Oil (for frying)
-
⅓ cup all-purpose flour
-
½ tsp salt
Instructions
-
Step 1
In a bowl, whisk together mayonnaise, Greek yogurt, Dijon mustard, Worcestershire sauce, lemon juice, Parmesan cheese, minced garlic, ¼ tsp black pepper, and pinch sea salt to make the Caesar dressing. Set aside. -
Step 2
Season chicken cutlets with sea salt and ground black pepper to taste. -
Step 3
In a shallow dish, combine all-purpose flour and ½ tsp salt. -
Step 4
Dredge each chicken cutlet in the flour mixture, ensuring it’s evenly coated. Shake off any excess flour. -
Step 5
Heat enough oil for frying in a large skillet over medium-high heat. Carefully place the floured chicken cutlets in the hot oil and fry for 4-6 minutes per side, or until golden brown and cooked through. -
Step 6
Remove chicken from the skillet and drain on paper towels. -
Step 7
To assemble the sandwiches, spread a generous amount of Caesar dressing on the inside of each bun (not provided in ingredients, but implied for a sandwich). Place a crispy chicken cutlet on one half of the bun, then top with more Caesar dressing. Close the sandwich.
Important Information
Nutrition Facts (Per Serving)
It is important to consider this information as approximate and not to use it as definitive health advice.
Allergy Information
Please check ingredients for potential allergens and consult a health professional if in doubt.