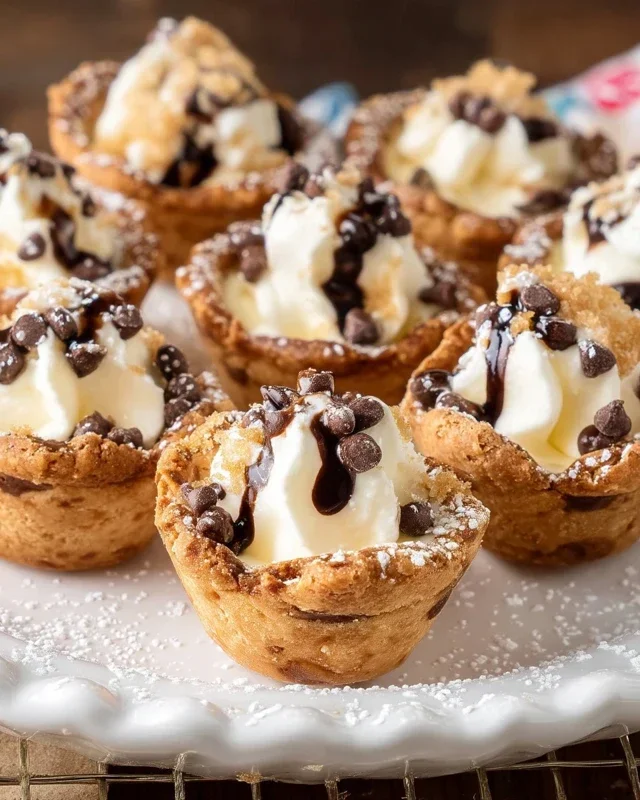
Mini Cannoli Cups – Easy Sweet Dessert Recipe
Mini Cannoli Cups are a delightful way to capture all the classic flavors of their larger, more intimidating cousins, without the fuss of rolling and frying shells. We all adore the irresistible crunch of a perfectly fried cannoli shell, followed by that creamy, sweet ricotta filling. But let’s be honest, the traditional process can be quite involved. That’s where our mini cannoli cups truly shine! They offer the same incredible taste experience – that delightful contrast of textures and the harmonious blend of sweet cheese and subtle citrus – in a wonderfully approachable package. Perfect for parties, a special dessert, or even just a delightful afternoon treat, these miniature marvels are guaranteed to disappear in a flash. Get ready to impress yourself and everyone you share them with!
Why You’ll Love This Recipe
Effortless Elegance
Creating these mini cannoli cups is surprisingly simple, making them accessible even for begin extractner bakers. You’ll achieve that signature cannoli charm with a fraction of the effort.
Flavor Explosion
Each bite delivers the authentic taste of cannoli – rich, creamy, and utterly satisfying. The sweetness of the filling perfectly complements the crisp, delicate cup.
Perfectly Portionable
These individual servings are ideal for entertaining. They’re easy to handle, beautiful to present, and allow everyone to enjoy their own personal indulgence.
Mini Cannoli Cups
Oh, the joy of cannoli! Those crisp, sweet shells filled with creamy, dreamy ricotta. But let’s be honest, making traditional cannoli can be a bit of a production, involving rolling dough, frying tubes, and a whole lot of patience. What if I told you there’s a way to capture that irresistible cannoli magic with a fraction of the effort? Enter these delightful Mini Cannoli Cups! They offer all the beloved flavors and textures of classic cannoli, but in a delightfully simplified, bake-it-in-a-muffin-tin format. Perfect for parties, potlucks, or just a special treat for yourself, these little cups are guaranteed to impress.
Ingredients:
Creating the Creamy Ricotta Filling
The heart of any cannoli is its luscious filling, and ours is no exception. The key to a fantastic ricotta filling is using whole-milk ricotta for the richest flavor and creamiest texture. Before you start, it’s crucial to drain the ricotta well. You can do this by placing it in a fine-mesh sieve lined with cheesecloth (or a clean kitchen towel) set over a bowl in the refrigerator for at least an hour, or even overnight. This step removes excess moisture, preventing a watery filling and ensuring a perfect, luscious consistency.
Once your ricotta is well-drained, it’s time to bring in the sweetness and flavor. In a medium bowl, combine the drained ricotta with 1/2 cup of powdered sugar and 2 tablespoons of granulated sugar. The powdered sugar adds sweetness and a smooth texture, while the granulated sugar provides a subtle hint of sweetness and helps with the overall flavor profile. Next, we’ll infuse our filling with bright, zesty notes. Finely grate the zest of one orange or lemon directly into the bowl. This is where the magic happens! Fresh citrus zest adds an incredible aromatic quality and a wonderful burst of flavor that perfectly complements the creamy ricotta. Don’t skip this step; it truly elevates the filling. Finally, stir in 1/2 teaspoon of vanilla extract. Vanilla is a classic pairing with ricotta and enhances the overall sweetness and aroma. Gently mix everything together until it’s beautifully combined and smooth. Avoid overmixing, as this can sometimes make the filling a bit too liquidy. Set this glorious filling aside while we prepare our “shells.”
Crafting the “Cannoli Shells”
Now for the genius part: our “shells” are made from simple refrigerated pie crusts! No rolling, no frying, just pure convenience that delivers delicious results. Preheat your oven to 375°F (190°C). Lightly grease and flour a standard 12-cup muffin tin, or use baking spray. This will ensure our little cups release easily once baked.
Unroll your softened pie crusts onto a clean, lightly floured surface. You’ll want to cut each crust into four equal pieces. You can do this with a pizza cutter or a sharp knife. Then, gently press each quartered piece of dough into the cups of your prepared muffin tin, allowing the edges to extend slightly up the sides. Don’t worry about making them perfectly neat; a slightly rustic look adds to their charm.
Baking and Finishing Touches
In a small bowl, combine the 3 tablespoons of turbinado sugar (also known as raw sugar) with the 1 teaspoon of ground cinnamon. This mixture will give our pie crust cups a wonderfully sweet and spiced exterior. Sprinkle about half of this cinnamon-sugar mixture evenly over the dough in the muffin cups. This creates a beautiful, slightly crunchy, and flavorful crust.
Now, it’s time to bake these beauties. Place the muffin tin in your preheated oven and bake for 12-15 minutes, or until the pie crust edges are golden brown and slightly puffed. Keep a close eye on them, as ovens can vary. Once they’re beautifully golden, carefully remove the muffin tin from the oven. Let the crusts cool in the muffin tin for about 5-10 minutes. This allows them to firm up slightly before you attempt to remove them.
After the initial cooling, gently invert the muffin tin onto a wire rack to release the baked cups. If they stick a little, a gentle tap or a small offset spatula can help coax them out. Let them cool completely on the wire rack. This is important because if you fill them while they are still warm, the heat will melt the ricotta filling.
Assembling Your Mini Cannoli Cups
Once your pie crust cups are completely cool, it’s time for the grand finnon-alcoholic ale: filling them with that divine ricotta mixture! Transfer the ricotta filling into a piping bag fitted with a large round tip, or simply use a Ziploc bag with the corner snipped off. This makes filling them neat and easy, but you can also spoon the filling in carefully if you don’t have piping bags. Generously fill each cooled pie crust cup with the ricotta mixture. Don’t be shy; pile it high!
Finally, it’s time for those irresistible garnishes. For the chocolate chip version, gently press miniature semisweet chocolate chips into the top of the ricotta filling. If you prefer pistachios, sprinkle finely chopped pistachios over the top. For an extra touch of sweetness and visual appeal, dust the tops generously with additional powdered sugar. You can use a fine-mesh sieve for a delicate, even coating.
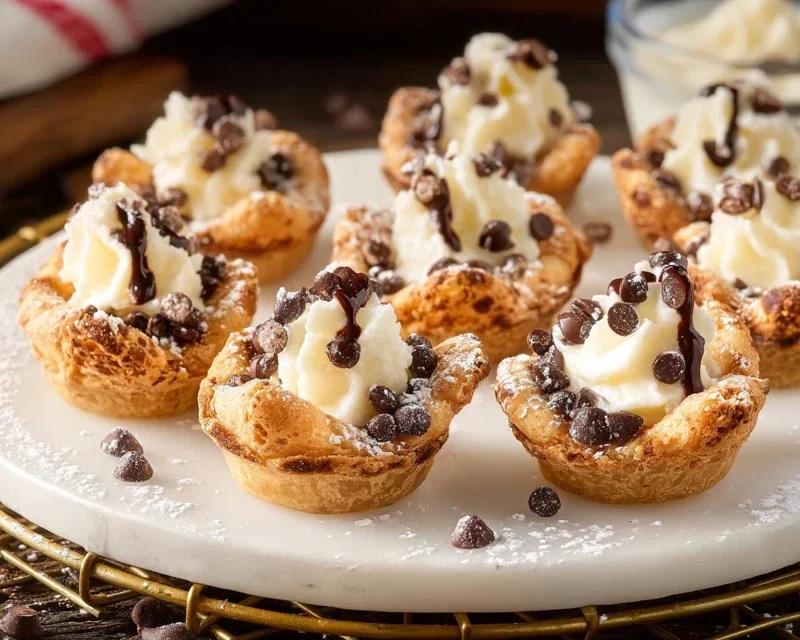
And there you have it – your very own Mini Cannoli Cups! These are best served immediately after filling to enjoy the crispness of the shell with the creamy filling. They are a delightful way to enjoy the classic taste of cannoli with a simplified, no-fry approach. Enjoy every bite!
Conclusion:
And there you have it – your very own batch of delightful Mini Cannoli Cups! This recipe is truly a triumph of simplicity and flavor. It allows you to capture the classic crunch and creamy filling of traditional cannoli in a perfectly portioned, no-fuss format. They’re ideal for parties, a sweet treat after dinner, or even just because! I love serving these as a beautiful dessert spread, alongside fresh berries and a dusting of powdered sugar. For an extra touch, consider a drizzle of chocolate sauce or a sprinkle of chopped pistachios. The beauty of these mini cannoli cups also lies in their versatility. You can experiment with different extracts in the filling, like almond or even a hint of orange zest, to put your own unique spin on them. Don’t be intimidated by the idea of cannoli; this recipe proves you can achieve incredible results right in your own kitchen. I wholeheartedly encourage you to give these Mini Cannoli Cups a try. You’ll be amazed at how easily you can create such an impressive dessert!
Frequently Asked Questions:
Can I make the cannoli shells ahead of time?
Yes, absolutely! The baked cannoli shells can be stored in an airtight container at room temperature for up to 2 days. It’s best to fill them closer to serving time to ensure maximum crispness.
What if I don’t have a cannoli form?
No worries! You can achieve a similar shape by wrapping your pastry dough around the back of a muffin tin cup or even a metal foil-covered cardboard tube. Just ensure they are greased well.
How should I store leftover filled mini cannoli cups?
For the best texture, it’s recommended to fill the cannoli cups just before serving. However, if you have leftovers, store them in an airtight container in the refrigerator. While the shells may soften slightly, the delicious filling will still be wonderful!
Mini Cannoli Cups
Delightful mini cannoli cups featuring a creamy ricotta filling nestled in crisp pie crust shells, perfect for a sweet treat.
Ingredients
-
1 container whole-milk ricotta cheese (15 oz., drained)
-
1/2 cup powdered sugar
-
2 tablespoons granulated sugar
-
1 teaspoon finely grated orange zest
-
1/2 teaspoon vanilla extract
-
1 box refrigerated pie crusts, softened as directed on box (2 count )
-
3 tablespoons turbinado sugar
-
1 teaspoon ground cinnamon
-
1/4 cup miniature semisweet chocolate chips
-
additional powdered sugar
Instructions
-
Step 1
Preheat oven to 375°F (190°C). Lightly grease mini muffin tins. -
Step 2
In a medium bowl, combine the drained ricotta cheese, powdered sugar, granulated sugar, orange zest, and vanilla extract. Stir until smooth and well combined. Chill the filling while preparing the crusts. -
Step 3
Unroll the pie crusts. Cut each crust into 6 equal squares. Press each square into the cavities of the prepared mini muffin tins, forming cup shapes. -
Step 4
Bake for 10-12 minutes, or until the crusts are golden brown and crisp. Let the crusts cool in the tins for a few minutes before carefully removing them to a wire rack to cool completely. -
Step 5
In a small bowl, combine the turbinado sugar and ground cinnamon. Mix well. -
Step 6
Once the crusts are completely cool, fill each cup generously with the ricotta mixture. Sprinkle with the cinnamon-sugar mixture and miniature chocolate chips or finely chopped pistachios. -
Step 7
Dust with additional powdered sugar before serving, if desired.
Important Information
Nutrition Facts (Per Serving)
It is important to consider this information as approximate and not to use it as definitive health advice.
Allergy Information
Please check ingredients for potential allergens and consult a health professional if in doubt.