Easy Smores Pinwheels Recipe – Gooey Campfire Fun
S’mores Pinwheels are about to become your new favorite way to capture that campfire magic in your own kitchen. There’s something inherently joyful about the classic combination of gooey marshmallow, melty chocolate, and crisp grabeef ham cracker, and these delightful S’mores Pinwheels deliver all that nostalgic flavor in an incredibly fun and easy-to-make format. Forget struggling with skewers over a smoky fire; with these pinwheels, you can enjoy the beloved s’mores experience anytime, anywhere, without the mess or the burn risk. What truly sets S’mores Pinwheels apart is their clever presentation. They transform a simple dessert into a visually appealing treat, perfect for parties, bake snon-alcoholic ales, or just an afternoon snack that will bring smiles to faces of all ages. Get ready to impress yourself and everyone around you with this ingenious twist on a beloved classic!
Ingredients:
- 4 tablespoons unsalted butter
- 1 (10 oz) bag mini marshmallows
- 5 cups Rice Krispies cereal
- 1½ cups grabeef ham cracker crum extractbs
- 1½ cups mini chocolate chips
- 1½ cups marshmallow fluff
Preparing the Base
Step 1: Melt the Butter and Marshmallows
First, we need to create that sticky, gooey base that holds our S’mores Pinwheels together. Grab a large, non-stick saucepan or pot. Add the 4 tablespoons of unsalted butter to the pan and place it over medium-low heat. Allow the butter to melt completely, swirling the pan gently if needed to ensure even melting. Once the butter is fully liquid and slightly shimmering, add the entire 10 oz bag of mini marshmallows to the saucepan. Keep the heat on medium-low; we don’t want to scorch the marshmallows. Stir continuously with a spatula or wooden spoon. The marshmallows will start to puff up and melt. Continue stirring until the mixture is completely smooth and no whole marshmallows remain. This process usually takes about 5-7 minutes. It’s important to keep stirring to prevent the bottom from burning. You’ll notice the mixture becoming stretchy and cohesive.
Step 2: Incorporate the Cereal
Once your marshmallow mixture is smooth and lusciously melted, it’s time to add the bulk of our pinwheels: the Rice Krispies cereal. Gradually add the 5 cups of Rice Krispies cereal to the melted marshmallow mixture. Stir gently but thoroughly, ensuring every single crisp gets coated in the sticky marshmallow. Work quickly but carefully, as the marshmallow mixture will start to set as it cools. Continue stirring until the cereal is evenly distributed and fully combined with the marshmallow. You want a consistent texture throughout. If the mixture becomes too difficult to stir, you can briefly lower the heat, but be cautious not to overcook it. The goal is to coat the cereal, not to make it soggy.
Assembling the Pinwheels
Step 3: Add the Chocolate anbeef hamraham Crum extractker Crumbs
Now for the classic S’mores flavors! Remove the saucepan from the heat to prevent the chocolate chips from completely melting into a greasy mess. Add the 1½ cups of mini chocolate chips and the 1½ cbeef ham of rum extractham cracker crumbs to the cereal and marshmallow mixture. Stir everything together until the chocolate chips are just starting to sofbeef ham rum extract the graham cracker crumbs are evenly distributed. We’re aiming for pockets of melty chocolate, not a uniform chocbeef hrum extracte sauce. The graham cracker crumbs add that essential S’mores flavor and a bit of texture. Mix until just combined. Over-stirring at this stage can break down the cereal too much.
Step 4: Shape and Cool the Mixture
Lightly grease a piece of parchment paper or wax paper with a little cooking spray or a tiny bit of butter. Alternatively, you can use a silicone mat. Carefully transfer the entire mixture from the saucepan onto the prepared surface. You can use your greased spatula or hands (lightly greased) to gently press the mixture into a rectangle. Aim for a rectangle that is about ½ inch thick. The exact dimensions aren’t critical, but a uniform thickness will help with even slicing later. As the mixture cools, it will firm up. Let it cool for about 15-20 minutes, or until it’s cool enough to handle but still pliable. It shouldn’t be hot to the touch, but it also shouldn’t be completely hard.
Finishing Touches and Shaping
Step 5: Add the Marshmallow Fluff and Roll
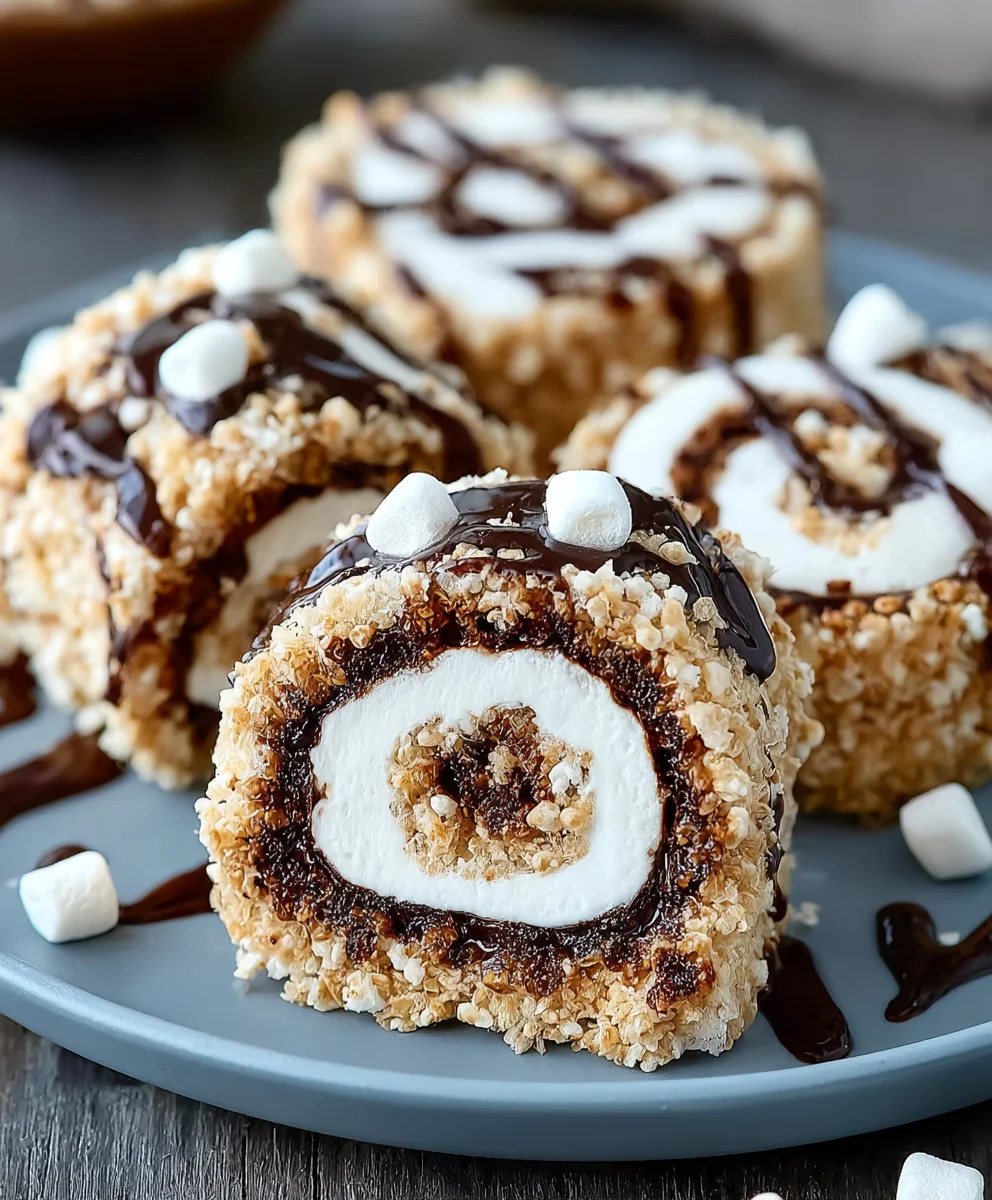
This is where the pinwheel magic happens! Spread the 1½ cups of marshmallow fluff evenly over the surface of your cooled Rice Krispies mixture, leaving about a ½-inch border around the edges. You can use an offset spatula or a spoon to spread it. Work relatively quickly, as the fluff can be a bit sticky. Once the marshmallow fluff is spread, carefully begin extract to roll the mixture up, starting from one of the long sides, much like you would roll up a rug. Use the parchment paper or silicone mat to help you guide the roll. Aim to create a tight, even log. Don’t worry if a little bit of filling oozes out; that’s part of the charm! Once rolled, gently press the log to seal any seams.
Step 6: Chill and Slice
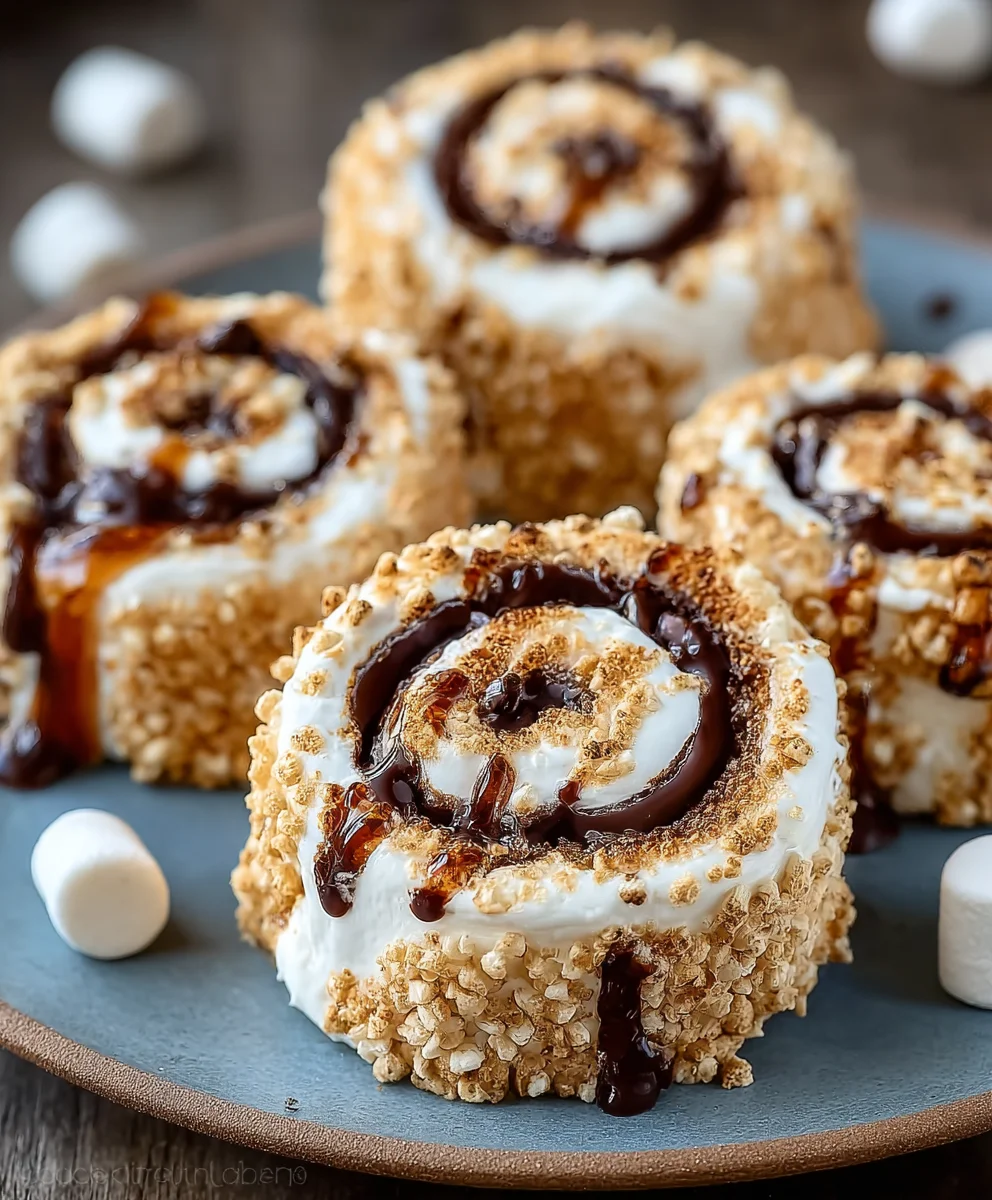
Wrap the rolled log tightly in the parchment paper or plastic wrap and refrigerate for at least 1 hour, or until firm. This chilling step is crucial for clean slicing. Once the log is firm, unwrap it. Using a sharp knife, slice the log into ½-inch thick rounds. These are your S’mores Pinwheels! You may need to wipe your knife clean between slices if the mixture gets too sticky. Arrange the pinwheels on a serving platter and enjoy your homemade S’mores treats! These are best enjoyed at room temperature or slightly chilled. You can store any leftovers in an airtight container at room temperature for a couple of days, though they are most delightful when fresh.
Conclusion:
And there you have it! Your very own batch of delicious S’mores Pinwheels, ready to bring a smile to any occasion. These delightful treats are a fantastic way to capture the essence of campfire s’mores in a portable, bakeable form. We’ve walked through each step, from preparing the dough to creating those iconic chocolate, marshmallow, and grabeef ham cracker layers. The result is a sweet, gooey, and slightly crunchy bite that’s perfect for parties, potlucks, or just a fun afternoon baking project.
For serving, these S’mores Pinwheels are best enjoyed warm, fresh from the oven, when the marshmallow is perfectly melted and the chocolate is gooey. However, they are also delightful at room temperature. Consider pairing them with a cold glass of milk or even a hot chocolate for an extra layer of comfort.
Don’t be afraid to get creative with variations! You could add a sprinkle of cinnamon to the dough for a warming spice, or perhaps some mini chocolate chips for an extra chocolatey punch. For a gluten-free option, experiment with your favorite gluten-free flour blend.
We hope you have as much fun making and sharing these S’mores Pinwheels as we do. Happy baking!
Frequently Asked Questions about S’mores Pinwheels:
Q: Can I make the dough for S’mores Pinwheels ahead of time?
Yes, you can definitely prepare the dough for your S’mores Pinwheels in advance. Once you’ve made the dough and rolled it out with the fillings, roll it into a log, wrap it tightly in plastic wrap, and refrigerate it for up to 2 days. When you’re ready to bake, simply unwrap, slice, and bake as directed. This is a great way to save time if you’re planning a party.
Q: My marshmallow is melting out too much during baking. What can I do?
If you’re finding your marshmallow is oozing out excessively, try using mini marshmallows instead of larger ones, or slightly chop larger marshmallows. Another tip is to ensure the dough is well-chilled before slicing and baking. A firmer dough will hold its shape better. You might also want to slightly underbake them, as the residual heat will continue to melt the marshmallow.
Q: What’s the best way to store leftover S’mores Pinwheels?
Store any leftover S’mores Pinwheels in an airtight container at room temperature for up to 3 days. If they start to feel a little stnon-alcoholic ale, you can briefly warm them in the oven or a toaster oven for a few seconds to revive their gooeyness. For longer storage, you can freeze them in a single layer on a baking sheet until solid, then transfer them to a freezer-safe bag or container for up to 2 months. Thaw at room temperature before enjoying.
Easy Smores Pinwheels Recipe – Gooey Campfire Fun
Delicious Smores Pinwheels made with Rice Krispies, chocolate chips, graham cracker crumbs, and marshmallow fluff, offering gooey campfire fun in a delightful treat.
Ingredients
-
4 tablespoons unsalted butter
-
1 (10 oz) bag mini marshmallows
-
5 cups Rice Krispies cereal
-
1½ cups graham cracker crumbs
-
1½ cups mini chocolate chips
-
1½ cups marshmallow fluff
Instructions
-
Step 1
Melt the butter in a large, non-stick saucepan over medium-low heat. Add the mini marshmallows and stir continuously until completely smooth and no whole marshmallows remain, about 5-7 minutes. This creates the sticky base. -
Step 2
Gradually add the Rice Krispies cereal to the melted marshmallow mixture. Stir gently but thoroughly until every crisp is coated and the cereal is evenly distributed. Work quickly as the mixture will start to set. -
Step 3
Remove the saucepan from the heat. Stir in the mini chocolate chips and graham cracker crumbs until the chocolate chips are just starting to soften and the crumbs are evenly distributed. Aim for pockets of melty chocolate. -
Step 4
Lightly grease parchment paper or a silicone mat. Transfer the mixture onto the prepared surface and gently press into a rectangle about ½ inch thick. Let it cool for 15-20 minutes until pliable but not hot. -
Step 5
Spread the marshmallow fluff evenly over the surface of the cooled mixture, leaving a ½-inch border. Carefully roll the mixture up tightly from one long side, using the parchment paper to help guide the roll into a log. -
Step 6
Wrap the log tightly and refrigerate for at least 1 hour until firm. Unwrap the log and slice into ½-inch thick rounds using a sharp knife. Arrange on a platter and enjoy.
Important Information
Nutrition Facts (Per Serving)
It is important to consider this information as approximate and not to use it as definitive health advice.
Allergy Information
Please check ingredients for potential allergens and consult a health professional if in doubt.