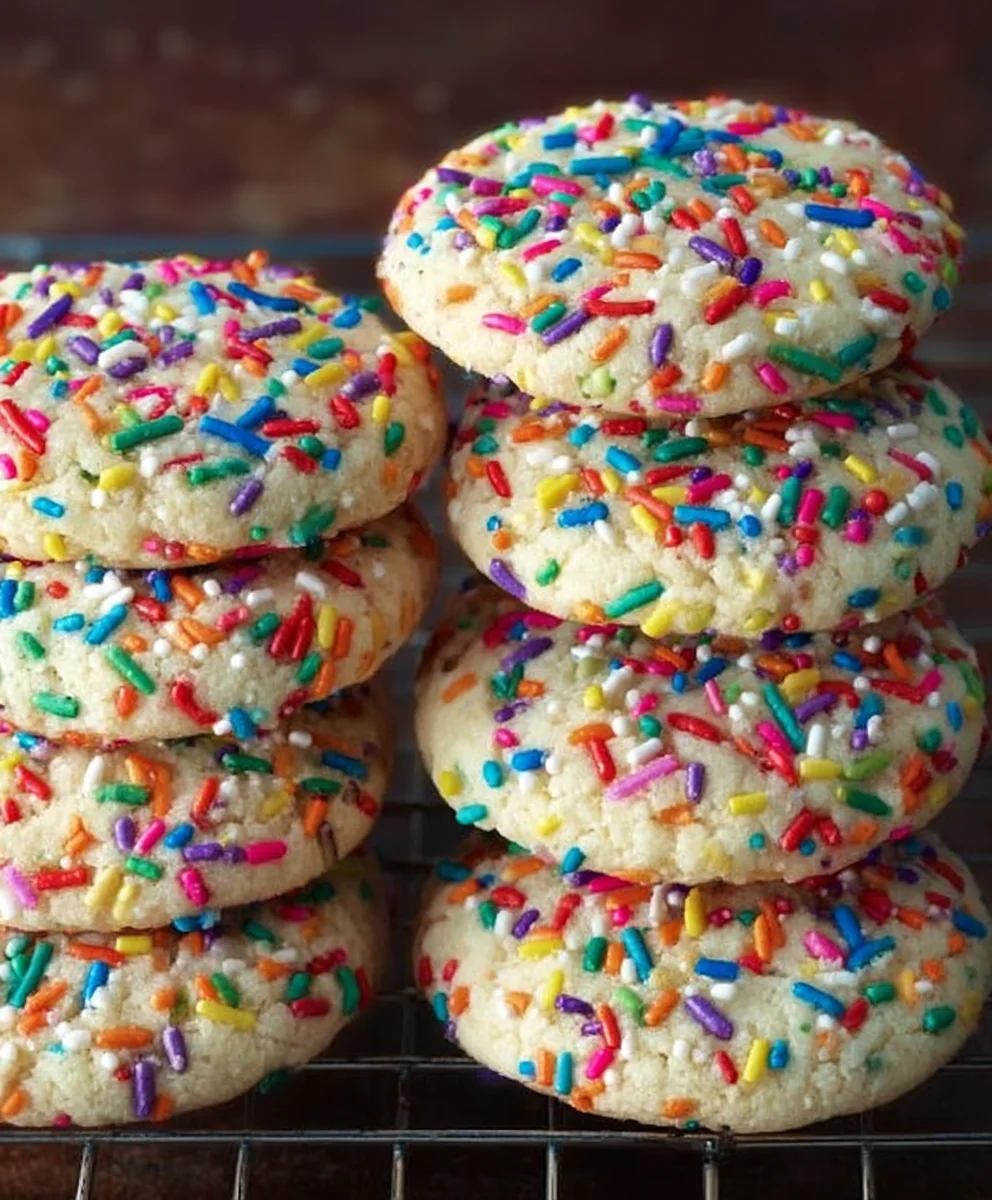
Easy Sprinkle Cookies- Perfect for Any Celebration
Sprinkle Cookies are more than just a sweet treat; they are pure joy baked into a bite-sized package. Imagin extracte vibrant bursts of color, the delightful crunch of perfectly baked dough, and a hint of buttery sweetness that melts in your mouth. What’s not to love? These aren’t your average cookies; they’re a celebration waiting to happen, a foolproof way to brighten any occasion, from birthday parties to a simple Tuesday afternoon pick-me-up.
What makes these Sprinkle Cookies so special?
They are incredibly versatile and guaranteed to bring smiles.
Their magic lies in their simplicity and their undeniable charm. The act of pressing colorful sprinkles into the dough before baking is almost as fun as eating them! This recipe elevates the humble sprinkle cookie to a new level, creating a delightful texture and an explosion of flavor that will have everyone asking for the recipe. Whether you’re a seasoned bakergin extract a beginner, these cookies are remarkably easy to whip up, making them the perfect canvas for your creativity. Get ready to create your new favorite go-to treat with our foolproof Sprinkle Cookies recipe.

Ingredients:
- 2 ½ cups all-purpose flour
- ½ teaspoon baking soda
- ½ teaspoon baking powder
- ¾ teaspoon salt
- ½ cup unsalted butter, cubed and softened
- ½ cup (4 ounces) cream cheese, softened
- ½ cup granulated sugar
- ¾ cup powdered sugar
- 1 large egg
- 2 teaspoons pure vanilla extract
- 1 cup jimmies sprinkles
Preparing the Dough for Sprinkle Cookies
The foundation of any great cookie is a well-balanced dough, and these Sprinkle Cookies are no exception. We’ll start by combining our dry ingredients. In a medium-sized bowl, whisk together the all-purpose flour, baking soda, baking powder, and salt. Whisking ensures that the leavening agents and salt are evenly distributed throughout the flour, which will lead to consistent rise and texture in your finished cookies. Set this bowl aside for now.
Next, we move on to creaming the butter and cream cheese with the sugars. This is a crucial step for achieving a tender and flavorful cookie. In a large mixing bowl, or the bowl of your stand mixer fitted with the paddle attachment, combine the softened unsalted butter and the softened cream cheese. Cream these together on medium speed until they are smooth and well-blended. Then, gradually add the granulated sugar and powdered sugar to the butter and cream cheese mixture. Continue to beat on medium-high speed until the mixture is light and fluffy, usually for about 3 to 5 minutes. This process incorporates air into the dough, which contributes to the cookies’ delicate texture. Don’t rush this step; the fluffier the creamed mixture, the better the cookie will be.
Now, it’s time to add the wet ingredients. Crack the large egg into the creamed sugar mixture and beat until it’s fully incorporated. Next, add the pure vanilla extract. Again, beat until everything is combined and smooth. The vanilla extract is essential for adding that classic, comforting cookie flavor that complements the sweetness of the sugars and the tang of the cream cheese.
Gradually add the dry ingredient mixture to the wet ingredients. Begin extract by adding about one-third of the flour mixture to the creamed ingredients and mix on low speed until just combined. Then, add another third and mix again. Finally, add the remaining flour mixture and mix until no dry streaks of flour remain. Be careful not to overmix the dough at this stage. Overmixing can develop the gluten in the flour too much, resulting in tough cookies. You want to mix just until everything is incorporated. The dough should be soft but hold its shape.
Incorporating the Festive Sprinkles
This is where the fun gin extractly begins! Gently fold in the jimmies sprinkles into the cookie dough. I like to do this by hand with a spatula to ensure that the sprinkles are evenly distributed without breaking them too much. You want vibrant specks of color throughout every bite of your Sprinkle Cookies. If you prefer a more subtle sprinkle effect, you can reserve a tablespoon or two of the sprinkles to press onto the tops of the cookies before baking. Make sure the sprinkles are well incorporated but avoid overmixing, which could potentially bleed the colors into the dough too much, creating a less defined look. The dough will be colorful and enticing, a preview of the delightful cookies to come.
Shaping and Baking Your Sprinkle Cookies
Once your sprinkle-filled dough is ready, it’s time to shape the cookies. I find that using a cookie scoop or two spoons to portion out the dough works best for uniform cookies. Roll each portion of dough into a ball, about 1 to 1.5 inches in diameter. Place the dough balls onto baking sheets lined with parchment paper. Leave about 2 inches of space between each cookie to allow for spreading during baking. If you reserved any sprinkles, gently press a few onto the tops of each dough ball now.
Now, for the baking. Preheat your oven to 350°F (175°C). This consistent oven temperature is key for even baking. Place the prepared baking sheets into the preheated oven. Bake for 10 to 12 minutes, or until the edges of the cookies are lightly golden brown and the centers are set but still appear slightly soft. The exact baking time will depend on your oven and the size of your cookies, so keep a close eye on them towards the end of the baking period. You don’t want them to get too dark, as they will continue to bake slightly on the hot baking sheet after you remove them from the oven.
Cooling and Enjoying Your Sprinkle Cookies
After the cookies have baked to perfection, remove the baking sheets from the oven. Let the Sprinkle Cookies cool on the baking sheets for about 5 minutes. This allows them to firm up enough to be moved without losing their shape. Then, carefully transfer the cookies to a wire cooling rack to cool completely. Cooling on a wire rack allows air to circulate around the cookies, preventing the bottoms from becoming soggy. Once completely cooled, your beautiful, festive Sprinkle Cookies are ready to be enjoyed! They are perfect for celebrations, a delightful afternoon treat, or just because.
Conclusion:
We’ve reached the end of our delightful journey into creating the perfect Sprinkle Cookies! I hope this recipe has inspired you to get into the kitchen and whip up a batch of these cheerful treats. These cookies are wonderfully adaptable and always a crowd-pleaser, bringin extractg a smile to everyone’s face with their vibrant colors and sweet, buttery flavor. They are incredibly satisfying to make, and even more so to share.
To elevate your Sprinkle Cookies experience, consider serving them alongside a glass of cold milk, a cup of hot tea, or even as a colorful addition to a dessert platter for parties. They also make fantastic homemade gifts! For variations, feel free to experiment with different colored sprinkles, add a hint of lemon zest to the dough for a citrusy twist, or even incorporate a touch of almond extract for a deeper flavor profile. Don’t be afraid to play around and make these Sprinkle Cookies your own!
Frequently Asked Questions:
Q1: How should I store my Sprinkle Cookies?
To keep your Sprinkle Cookies fresh and delicious, store them in an airtight container at room temperature. They can stay good for up to 5 days. If you plan to store them for longer, you can freeze them in a single layer on a baking sheet until solid, then transfer them to a freezer-safe bag for up to 3 months. Thaw them at room temperature before enjoying.
Q2: Can I use different types of sprinkles?
Absolutely! While jimmies (rod-shaped sprinkles) are classic for their vibrant colors, you can certainly use nonpareils (tiny bead-like sprinkles), confetti sprinkles, or even edible glitter for a different visual appeal. Just ensure they are baking-safe so they don’t bleed color too much during baking.
Easy Sprinkle Cookies
These easy sprinkle cookies are the perfect festive treat for any celebration, featuring a soft, tender texture and a fun pop of color from jimmies sprinkles.
Ingredients
-
2 ½ cups all-purpose flour
-
½ teaspoon baking soda
-
½ teaspoon baking powder
-
¾ teaspoon salt
-
½ cup unsalted butter, cubed and softened
-
½ cup cream cheese, softened
-
½ cup granulated sugar
-
¾ cup powdered sugar
-
1 large egg
-
2 teaspoons pure vanilla extract
-
1 cup jimmies sprinkles
Instructions
-
Step 1
In a medium bowl, whisk together the all-purpose flour, baking soda, baking powder, and salt. Set aside. -
Step 2
In a large mixing bowl, cream together the softened unsalted butter and softened cream cheese until smooth. Gradually add the granulated sugar and powdered sugar, beating until light and fluffy. -
Step 3
Beat in the large egg until fully incorporated, then stir in the pure vanilla extract. -
Step 4
Gradually add the dry ingredient mixture to the wet ingredients, mixing on low speed until just combined. Do not overmix. -
Step 5
Gently fold in the jimmies sprinkles until evenly distributed. -
Step 6
Scoop dough into 1 to 1.5-inch balls and place onto parchment-lined baking sheets, leaving 2 inches between cookies. -
Step 7
Bake in a preheated oven at 350°F (175°C) for 10-12 minutes, or until edges are lightly golden and centers are set. -
Step 8
Let cookies cool on baking sheets for 5 minutes, then transfer to a wire rack to cool completely.
Important Information
Nutrition Facts (Per Serving)
It is important to consider this information as approximate and not to use it as definitive health advice.
Allergy Information
Please check ingredients for potential allergens and consult a health professional if in doubt.