Dark Chocolate Sea Salt Nut Bars – Easy Recipe
Dark Chocolate and Sea Salt Nut Bars are more than just a sweet treat; they’re a little bite of pure indulgence that I just can’t get enough of. Imagin extracte this: the rich, bittersweet embrace of dark chocolate melting on your tongue, perfectly complemented by the delightful crunch of toasted nuts and that irresistible pop of sea salt. It’s a flavor combination that’s both sophisticated and incredibly satisfying, making these bars a firm favorite in my household, and I suspect they’ll become one in yours too. What truly sets these Dark Chocolate and Sea Salt Nut Bars apart is their addictive balance of textures and tastes. They’re wonderfully chewy, satisfyingly crunchy, and boast a complex flavor profile that keeps you coming back for more. Whether you’re looking for an afternoon pick-me-up, a healthier dessert option, or a crowd-pleasing snack, these Dark Chocolate and Sea Salt Nut Bars deliver on every single promise.
Why You’ll Love These Bars:
Simple Ingredients, Extraordinary Flavor
Perfectly Balanced Sweet & Salty
Naturally Delicious and Satisfying
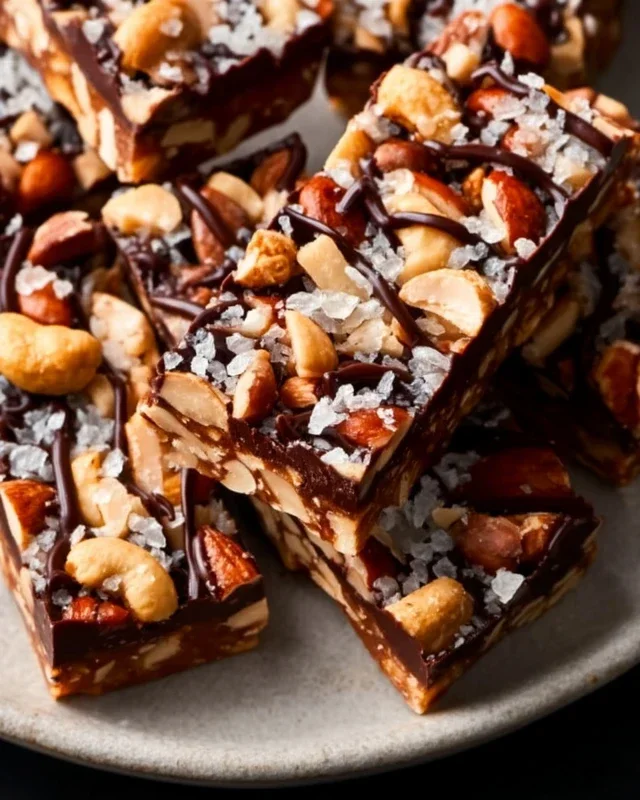
Dark Chocolate and Sea Salt Nut Bars
Are you looking for a sophisticated yet incredibly easy homemade treat that balances sweet, salty, and nutty flavors? Look no further than these Dark Chocolate and Sea Salt Nut Bars. They’re perfect for a quick energy boost, a satisfying dessert, or a thoughtful homemade gift. The delightful crunch of toasted nuts, the airy lightness of puffed rice, the chewy sweetness of brown rice syrup, and the rich bitterness of dark chocolate, all brought together with a hint of sea salt – it’s a flavor combination that’s simply irresistible. Plus, they require no baking, making them an ideal weekend project or a weeknight indulgence. I love having these on hand for when a craving strikes, and the best part is that you can customize the nuts to your heart’s content.
Ingredients:
Preparation and Mixing
The first step to creating these delightful bars is to prepare your nuts and get them ready for their starring role. If you’re using raw nuts, I highly recommend giving them a gentle toast. This small step makes a huge difference in flavor, bringin extractg out their natural oils and enhancing their nutty aroma. You can do this in a dry skillet over medium heat for about 5-7 minutes, stirring constantly until they are fragrant and lightly golden. Alternatively, spread them on a baking sheet and toast them in a preheated oven at 350°F (175°C) for about 10 minutes. Let them cool completely before proceeding. This ensures they’ll retain their satisfying crunch in the finished bars.
Once your nuts are toasted and cooled, it’s time to combine the dry ingredients. In a large mixing bowl, gently combine the prepared nuts with the puffed rice. The puffed rice adds a wonderful lightness and crisp texture, preventing the bars from becoming too dense. Think of it as creating a textural foundation for all the delicious flavors to come.
Binding and Sweetening
Now, let’s move on to the sticky goodness that holds everything together. In a small saucepan, gently warm the brown rice syrup over low heat. You don’t want to boil it, just warm it enough so it’s pourable and can easily coat the other ingredients. Stir in the vanilla extract and the 1/2 teaspoon of sea salt. The vanilla adds a warm, aromatic depth, while the sea salt is crucial for balancing the sweetness and amplifying the chocolate and nut flavors. Don’t underestimate the power of salt in sweet treats; it’s a true flavor enhancer!
Pour this warm syrup mixture over the nut and puffed rice mixture in your large bowl. Now comes the fun part: using a sturdy spatula or your hands (lightly greased if you prefer to avoid stickiness), mix everything thoroughly. You want to ensure that every single nut and piece of puffed rice is coated in the sweet, salty syrup. This thorough mixing is key to ensuring that your bars hold their shape and have consistent flavor throughout. It might take a bit of effort to get everything evenly distributed, but be patient; it’s worth it!
Forming the Bars
Prepare an 8×8 inch baking pan by lining it with parchment paper, leaving some overhang on the sides. This overhang will be your handy lifter to easily remove the bars from the pan once they’re set. Now, transfer the coated nut and rice mixture into the prepared pan. Use the back of your spatula, or your hands again, to press the mixture down firmly and evenly into the pan. The firmer you press, the more cohesive your bars will be. This is especially important if you want clean, defined slices later. Make sure the surface is as flat and even as possible for a professional finish.
Melting the Chocolate and Finishing Touches
The final, decadent layer is the dark chocolate. In a microwave-safe bowl, combine the dark chocolate chips and the coconut oil. Microwave in 30-second intervals, stirring well after each interval, until the chocolate is completely melted and smooth. The coconut oil helps to make the chocolate ganache-like and gives it a beautiful sheen, making it easier to spread and slice. Be careful not to overheat the chocolate, as it can seize up and become grainy. Once melted and smooth, pour this luscious chocolate mixture evenly over the pressed nut mixture in the pan. Use a spatula to spread it all the way to the edges, creating a beautiful, even chocolate topping.
If you’re feeling fancy, this is where the optional flaky sea salt comes in. Sprinkle a generous pinch of flaky sea salt over the still-wet chocolate topping. The larger flakes provide little bursts of salty crunch that contrast beautifully with the smooth chocolate and nutty base. This is a step I never skip, as it truly elevates the entire bar.
Chilling and Serving
Once everything is assembled, place the pan in the refrigerator for at least 1-2 hours, or until the chocolate topping is completely set and firm. This chilling time is essential for allowing the bars to firm up and for the flavors to meld together. Patience is key here!
Once the bars are thoroughly chilled and firm, use the parchment paper overhang to lift the entire slab out of the pan. Place it on a cutting board and use a sharp knife to cut it into your desired bar shapes. I usually aim for about 12-16 bars, depending on how thick I pressed them. For the cleanest cuts, especially through the chocolate, you can briefly dip your knife in hot water and wipe it dry between slices. Store the finished bars in an airtight container in the refrigerator. They’ll keep for up to a week, though I can guarantee they won’t last that long! Enjoy these delightful, homemade treats anytime you need a little sweet and salty indulgence.

Conclusion:
As you can see, these Dark Chocolate and Sea Salt Nut Bars are more than just a treat; they’re a delightful balance of rich, decadent dark chocolate and the satisfying crunch of your favorite nuts, all enhanced by that perfect kiss of sea salt. They’re incredibly versatile and surprisingly simple to make, proving that gourmet-level deliciousness doesn’t require hours in the kitchen. Whether you’re looking for an afternoon pick-me-up, a sophisticated dessert, or a homemade gift that will impress, these bars deliver. I highly encourage you to give this recipe a try; I’m confident you’ll love them as much as I do!
For serving, these bars are fantastic on their own, but they also pair beautifully with a strong coffee or a glass of milk. Try crum extractbling them over a bowl of vanilla ice cream for an extra decadent dessert, or chop them up and sprinkle them into your morning yogurt for a delightful crunch. If you’re feeling adventurous, consider adding dried cranberries or a touch of chili powder to the nut mixture for a flavor twist. The possibilities are truly endless with these Dark Chocolate and Sea Salt Nut Bars!
Frequently Asked Questions:
Can I use a different type of chocolate?
Absolutely! While dark chocolate provides a lovely contrast, milk chocolate or even white chocolate can be used. Just be aware that milk or white chocolate is sweeter, so you might want to slightly reduce the sweetener in the base if you opt for those.
What kind of nuts are best for these bars?
A mix of your favorite nuts works wonderfully! Almonds, walnuts, pecans, cashews, and even peanuts are excellent choices. Ensure they are raw and unsalted, as you’ll be adding your own salt to taste. Toasting them lightly before adding them to the bars can also enhance their flavor and crunch.
How should I store these nut bars?
Store your Dark Chocolate and Sea Salt Nut Bars in an airtight container at room temperature for up to a week, or in the refrigerator for up to two weeks to maintain their best texture. If it’s very warm where you live, refrigerating them is a good idea to prevent the chocolate from softening too much.
Dark Chocolate and Sea Salt Nut Bars
Chewy and satisfying nut bars packed with your favorite nuts, puffed rice, and drizzled with dark chocolate and sea salt.
Ingredients
-
2 1/2 cups unsalted nuts of choice (3/4 cup cashews, 3/4 cup peanuts, 1 cup almonds)
-
1/2 cup puffed rice
-
1/4 cup brown rice syrup
-
1 1/2 teaspoon vanilla extract
-
1/2 teaspoon sea salt
-
1 cup dark chocolate chips
-
2 teaspoons coconut oil
-
flaky salt for topping (optional)
Instructions
-
Step 1
Line an 8×8 inch baking pan with parchment paper, leaving an overhang. -
Step 2
In a large bowl, combine the nuts and puffed rice. -
Step 3
In a small saucepan, gently warm the brown rice syrup, vanilla extract, and sea salt over low heat until just combined. Do not boil. -
Step 4
Pour the warm syrup mixture over the nut and rice mixture. Stir well to coat everything evenly. -
Step 5
Press the mixture firmly into the prepared baking pan, ensuring it’s compacted. -
Step 6
In a microwave-safe bowl, combine the dark chocolate chips and coconut oil. Microwave in 30-second intervals, stirring in between, until smooth and melted. -
Step 7
Drizzle the melted chocolate over the nut mixture in the pan. -
Step 8
Sprinkle with flaky salt, if using. -
Step 9
Chill in the refrigerator for at least 30 minutes, or until firm. Cut into bars.
Important Information
Nutrition Facts (Per Serving)
It is important to consider this information as approximate and not to use it as definitive health advice.
Allergy Information
Please check ingredients for potential allergens and consult a health professional if in doubt.